Multitenancy
Introduction & Overview
CAP has built-in support for multitenancy with the @sap/cds-mtxs package.
Essentially, multitenancy is the ability to serve multiple tenants through single clusters of microservice instances, while strictly isolating the tenants' data. Tenants are clients using SaaS solutions.
In contrast to single-tenant mode, applications wait for tenants to subscribe before serving any end-user requests.
Learn more about SaaS applications.
This guide is available for Node.js and Java.
Use the toggle in the title bar or press v to switch.
Prerequisites
Make sure you have the latest version of @sap/cds-dk installed:
npm update -g @sap/cds-dkJumpstart with an application
To get a ready-to-use bookshop application you can modify and deploy, run:
cds init bookshop --add sample
cd bookshopcds init bookshop --java --add tiny-sample
cd bookshopEnable Multitenancy
Now, you can run this to enable multitenancy for your CAP application:
cds add multitenancySee what this adds to your Node.js project…
Adds package
@sap/cds-mtxsto your project:jsonc{ "dependencies": { "@sap/cds-mtxs": "^3" }, }Adds this configuration to your package.json to enable multitenancy with sidecar:
jsonc{ "cds": { "profile": "with-mtx-sidecar", "requires": { "[production]": { "multitenancy": true } } } }Adds a sidecar subproject at
mtx/sidecarwith this package.json:json{ "name": "bookshop-mtx", "dependencies": { "@cap-js/hana": "^2", "@sap/cds": "^9", "@sap/cds-mtxs": "^3", "@sap/xssec": "^4", "express": "^4" }, "devDependencies": { "@cap-js/sqlite": "^2" }, "engines": { "node": ">=20" }, "scripts": { "start": "cds-serve" }, "cds": { "profile": "mtx-sidecar" } }If necessary, modifies deployment descriptors such as
mta.yamlfor Cloud Foundry and Helm charts for Kyma.
See what this adds to your Java project…
Adds the following to .cdsrc.json in your app:
jsonc{ "profiles": [ "with-mtx-sidecar", "java" ], "requires": { "[production]": { "multitenancy": true } } }Adds the following to your srv/pom.xml in your app:
xml<dependency> <groupId>com.sap.cds</groupId> <artifactId>cds-feature-mt</artifactId> <scope>runtime</scope> </dependency>Adds the following to your srv/src/java/resources/application.yaml:
yml--- spring: config.activate.on-profile: cloud cds: multi-tenancy: mtxs.enabled: trueAdds a sidecar subproject at
mtx/sidecarwith this package.json:json{ "name": "bookshop-mtx", "dependencies": { "@cap-js/hana": "^2", "@sap/cds": "^9", "@sap/cds-mtxs": "^3", "@sap/xssec": "^4", "express": "^4" }, "devDependencies": { "@cap-js/sqlite": "^2" }, "scripts": { "start": "cds-serve", "build": "cds build ../.. --for mtx-sidecar --production && npm ci --prefix gen" }, "cds": { "profile": "mtx-sidecar" } }
Profile-based configuration presets
The profiles with-mtx-sidecar and mtx-sidecar activate pre-defined configuration presets, which are defined as follows:
{
  "[with-mtx-sidecar]": {
    requires: {
      db: {
        '[development]': {
           kind: 'sqlite',
           credentials: { url: 'db.sqlite' },
           schema_evolution: 'auto',
         },
        '[production]': {
           kind: 'hana',
           'deploy-format': 'hdbtable',
           'vcap': {
             'label': 'service-manager'
           }
         },
      },
      "[java]": {
        "cds.xt.ModelProviderService": { kind: 'rest', model:[] },
        "cds.xt.DeploymentService": { kind: 'rest', model:[] },
      },
      "cds.xt.SaasProvisioningService": false,
      "cds.xt.DeploymentService": false,
      "cds.xt.ExtensibilityService": false,
    }
  },
  "[mtx-sidecar]": {
    requires: {
      db: {
        "[development]": {
           kind: 'sqlite',
           credentials: { url: "../../db.sqlite" },
           schema_evolution: 'auto',
         },
        "[production]": {
           kind: 'hana',
           'deploy-format': 'hdbtable',
           'vcap': {
             'label': 'service-manager'
           }
         },
      },
      "cds.xt.ModelProviderService": {
        "[development]": { root: "../.." }, // sidecar is expected to reside in ./mtx/sidecar
        "[production]": { root: "_main" },
        "[prod]": { root: "_main" } // for simulating production in local tests
      },
      "cds.xt.SaasProvisioningService": true,
      "cds.xt.DeploymentService": true,
      "cds.xt.ExtensibilityService": true,
    },
    "[development]": {
      server: { port: 4005 }
    }
  },
  …
}
Inspect configuration
You can always inspect the effective configuration with cds env.
Install Dependencies
After adding multitenancy, install your application dependencies:
npm iAfter adding multitenancy, Maven build should be used to generate the model related artifacts:
mvn installError message: 'Invalid MTX sidecar configuration'
If you get the message 'Invalid MTX sidecar configuration', you need to add the dependency to @sap/cds-mtxs also to the package.json in your project root. This is a known issue in CDS 9.
Test-Drive Locally
For local testing, create a new profile that contains the multitenancy configuration:
cds add multitenancy --for local-multitenancyFor multitenancy you need additional dependencies in the pom.xml of the srv directory. To support mock users in the local test scenario add cds-starter-cloudfoundry:
<dependency>
  <groupId>com.sap.cds</groupId>
  <artifactId>cds-starter-cloudfoundry</artifactId>
</dependency>
Then you add additional mock users to the spring-boot profile:
---
spring:
  config.activate.on-profile: local-multitenancy
#...
cds:
  multi-tenancy:
    mtxs.enabled: true
  security.mock.users:
    - name: alice // [!code focus]
      tenant: t1
      roles: [ admin ]
    - name: bob // [!code focus]
      tenant: t1
      roles: [ cds.ExtensionDeveloper ]
    - name:  erin // [!code focus]
      tenant: t2
      roles: [ admin, cds.ExtensionDeveloper ]
Configure the sidecar to use dummy authentication.
{
  "cds": {
    "profile": "mtx-sidecar",
    "[development]": {
      "requires": {
        "auth": "dummy"
      }
    }
  }
}
Before deploying to the cloud, you can test-drive common SaaS operations with your app locally, including SaaS startup, subscribing tenants, and upgrading tenants.
Using multiple terminals…
In the following steps, we start two servers, the main app and MTX sidecar, and execute some CLI commands. So, you need three terminal windows.
1. Start MTX Sidecar
cds watch mtx/sidecarTrace output explained
In the trace output, we see several MTX services being served; most interesting for multitenancy: the ModelProviderService and the DeploymentService.
[cds] - connect using bindings from: { registry: '~/.cds-services.json' }
[cds] - connect to db > sqlite { url: '../../db.sqlite' }
[cds] - serving cds.xt.ModelProviderService { path: '/-/cds/model-provider' }
[cds] - serving cds.xt.DeploymentService { path: '/-/cds/deployment' }
[cds] - serving cds.xt.SaasProvisioningService { path: '/-/cds/saas-provisioning' }
[cds] - serving cds.xt.ExtensibilityService { path: '/-/cds/extensibility' }
[cds] - serving cds.xt.JobsService { path: '/-/cds/jobs' }
In addition, we can see a t0 tenant being deployed, which is used by the MTX services for book-keeping tasks.
[cds] - loaded model from 1 file(s):

  ../../db/t0.cds

[mtx|t0] - (re-)deploying SQLite database for tenant: t0
/> successfully deployed to db-t0.sqlite
With that, the server waits for tenant subscriptions, listening on port 4005 by default in development mode.
[cds] - server listening on { url: 'http://localhost:4005' }
[cds] - launched at 3/5/2023, 1:49:33 PM, version: 7.0.0, in: 1.320s
[cds] - [ terminate with ^C ]
If you get an error on server start, read the troubleshooting information.
2. Launch App Server
cds watch --profile local-multitenancyPersistent database
The server starts as usual, but automatically uses a persistent database instead of an in-memory one:
[cds] - loaded model from 6 file(s):

  db/schema.cds
  srv/admin-service.cds
  srv/cat-service.cds
  srv/user-service.cds
  ../../../cds-mtxs/srv/bootstrap.cds
  ../../../cds/common.cds

[cds] - connect using bindings from: { registry: '~/.cds-services.json' }
[cds] - connect to db > sqlite { url: 'db.sqlite' }
[cds] - serving AdminService { path: '/odata/v4/admin', impl: 'srv/admin-service.js' }
[cds] - serving CatalogService { path: '/odata/v4/catalog', impl: 'srv/cat-service.js' }
[cds] - serving UserService { path: '/user', impl: 'srv/user-service.js' }

[cds] - server listening on { url: 'http://localhost:4004' }
[cds] - launched at 3/5/2023, 2:21:53 PM, version: 6.7.0, in: 748.979ms
[cds] - [ terminate with ^C ]cd srv
mvn cds:watch -Dspring-boot.run.profiles=local-multitenancyPersistent database
The server starts as usual, with the difference that a persistent database is used automatically instead of an in-memory one:
2023-03-31 14:19:23.987  INFO 68528 --- [  restartedMain] c.s.c.bookshop.Application               : The following 1 profile is active: "local-mtxs"
...
2023-03-31 14:19:23.987  INFO 68528 --- [  restartedMain] c.s.c.services.impl.ServiceCatalogImpl   : Registered service ExtensibilityService$Default
2023-03-31 14:19:23.999  INFO 68528 --- [  restartedMain] c.s.c.services.impl.ServiceCatalogImpl   : Registered service CatalogService
2023-03-31 14:19:24.016  INFO 68528 --- [  restartedMain] c.s.c.f.s.c.runtime.CdsRuntimeConfig     : Registered DataSource 'ds-mtx-sqlite'
2023-03-31 14:19:24.017  INFO 68528 --- [  restartedMain] c.s.c.f.s.c.runtime.CdsRuntimeConfig     : Registered TransactionManager 'tx-mtx-sqlite'
2023-03-31 14:19:24.554  INFO 68528 --- [  restartedMain] o.s.b.w.embedded.tomcat.TomcatWebServer  : Tomcat initialized with port(s): 8080 (http)
2023-03-31 14:19:24.561  INFO 68528 --- [  restartedMain] o.apache.catalina.core.StandardService   : Starting service [Tomcat]
2023-03-31 14:19:24.561  INFO 68528 --- [  restartedMain] org.apache.catalina.core.StandardEngine  : Starting Servlet engine: [Apache Tomcat/9.0.71]
3. Subscribe Tenants
In the third terminal, subscribe to two tenants using one of the following methods.
cds subscribe t1 --to http://localhost:4005 -u yves:
cds subscribe t2 --to http://localhost:4005 -u yves:POST http://localhost:4005/-/cds/deployment/subscribe HTTP/1.1
Content-Type: application/json
Authorization: Basic yves:
{ "tenant": "t1" }const ds = await cds.connect.to('cds.xt.DeploymentService')
await ds.subscribe('t1')Run
cds help subscribeto see all available options.
cds subscribe explained
Be reminded that these commands are only relevant for local testing. For a deployed app, subscribe to your tenants through the BTP cockpit.
In the CLI commands, we use the pre-defined mock user
yves, see pre-defined mock users.The subscription is sent to the MTX sidecar process (listening on port 4005)
The sidecar reacts with trace outputs like this:
log[cds] - POST /-/cds/deployment/subscribe ... [mtx] - successfully subscribed tenant t1In response to each subscription, the sidecar creates a new persistent tenant database per tenant, keeping tenant data isolated:
log[cds] - POST /-/cds/deployment/subscribe [mtx] - (re-)deploying SQLite database for tenant: t1 > init from db/init.js > init from db/data/sap.capire.bookshop-Authors.csv > init from db/data/sap.capire.bookshop-Books.csv > init from db/data/sap.capire.bookshop-Books_texts.csv > init from db/data/sap.capire.bookshop-Genres.csv /> successfully deployed to ./../../db-t1.sqlite [mtx] - successfully subscribed tenant t1To unsubscribe a tenant, run:
shcds unsubscribe ‹tenant› --from http://localhost:4005 -u ‹user›Run
cds help unsubscribeto see all available options.
Test with Different Users/Tenants
Open the Manage Books app at http://localhost:4004/#Books-manage and log in with alice. Select Wuthering Heights to open the details, edit here the title and save your changes. You've changed data in one tenant.
To see requests served in tenant isolation, that is, from different databases, check that it's not visible in the other one. Open a private/incognito browser window and log in as erin to see that the title still is Wuthering Heights.
In the following example, Wuthering Heights (only in t1) was changed by alice. erin doesn't see it, though.
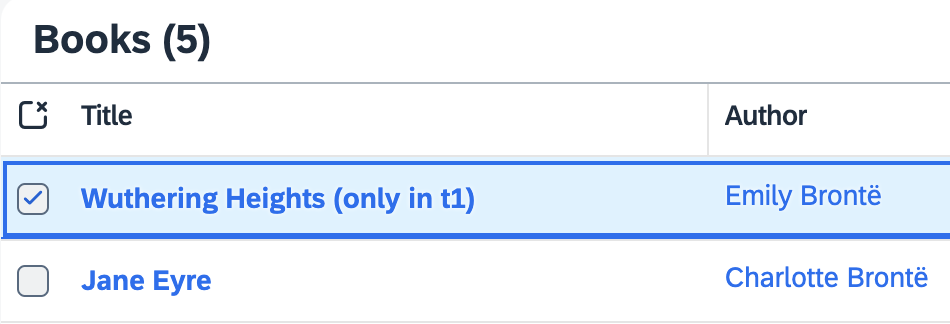
Use private/incognito browser windows to test with different tenants...
Do this to force new logins with different users, assigned to different tenants:
- Open a new private / incognito browser window.
- Open http://localhost:4004/#Books-manage in it → log in as
alice. - Repeat that with
erin, another pre-defined user, assigned to tenantt2.
Note tenants displayed in trace output...
We can see tenant labels in server logs for incoming requests:
[cds] - server listening on { url: 'http://localhost:4004' }
[cds] - launched at 3/5/2023, 4:28:05 PM, version: 6.7.0, in: 736.445ms
[cds] - [ terminate with ^C ]

...
[odata|t1] - POST /adminBooks { '$count': 'true', '$select': '... }
[odata|t2] - POST /adminBooks { '$count': 'true', '$select': '... }
...
Pre-defined users in mocked-auth
How users are assigned to tenants and how tenants are determined at runtime largely depends on your identity providers and authentication strategies. The mocked authentication strategy, used by default with cds watch, has a few pre-defined users configured. You can inspect these by running cds env requires.auth:
[bookshop] cds env requires.auth
{
 kind: 'basic-auth',
 strategy: 'mock',
 users: {
   alice: { tenant: 't1', roles: [ 'admin' ] },
   bob:   { tenant: 't1', roles: [ 'cds.ExtensionDeveloper' ] },
   carol: { tenant: 't1', roles: [ 'admin', 'cds.ExtensionDeveloper' ] },
   dave:  { tenant: 't1', roles: [ 'admin' ], features: [] },
   erin:  { tenant: 't2', roles: [ 'admin', 'cds.ExtensionDeveloper' ] },
   fred:  { tenant: 't2', features: ... },
   me:    { tenant: 't1', features: ... },
   yves:  { roles: [ 'internal-user' ] }
   '*':     true //> all other logins are allowed as well
 },
 tenants: { t1: { features: … }, t2: { features: '*' } }
}
You can also add or override users or tenants by adding something like this to your package.json:
"cds":{
 "requires": {
   "auth": {
     "users": {
       "u2": { "tenant": "t2" },
       "u3": { "tenant": "t3" }
     }
   }
 }
}
4. Upgrade Your Tenant
When deploying new versions of your app, you also need to upgrade your tenants' databases. For example, open db/data/sap.capire.bookshop-Books.csv and add one or more entries in there. Then upgrade tenant t1 as follows:
cds upgrade t1 --at http://localhost:4005 -u yves:POST http://localhost:4005/-/cds/deployment/upgrade HTTP/1.1
Content-Type: application/json
Authorization: Basic yves:
{ "tenant": "t1" }const ds = await cds.connect.to('cds.xt.DeploymentService')
await ds.upgrade('t1')Now, open or refresh http://localhost:4004/#Books-manage again as alice and erin → the added entries are visible for alice, but still missing for erin, as t2 has not yet been upgraded.
Deploy to Cloud
Cloud Foundry / Kyma
In order to get your multitenant application deployed, follow this excerpt from the deployment to CF and deployment to Kyma guides.
Once: Add SAP HANA Cloud, XSUAA, and App Router configuration. The App Router acts as a single point-of-entry gateway to route requests to. In particular, it ensures user login and authentication in combination with XSUAA.
cds add hana,xsuaaIf you intend to serve UIs you can easily set up the SAP Cloud Portal service:
cds add portalOnce: add a deployment descriptor:
cds add mtacds add helm,containerizeAdd xsuaa redirect for trial / extension landscapes
Add the following snippet to your xs-security.json and adapt it to the landscape you're deploying to:
  "oauth2-configuration": {
    "redirect-uris": ["https://*.cfapps.us10-001.hana.ondemand.com/**"]
  }
Learn more about configured BTP services for SaaS applications.
cds upcds up --to k8sSubscribe
Create a BTP subaccount to subscribe to your deployed application. This subaccount has to be in the same region as the provider subaccount, for example, us10.
See the list of all available regions.

In your subscriber account go to Instances and Subscription and select Create.

Select bookshop and use the only available plan default.
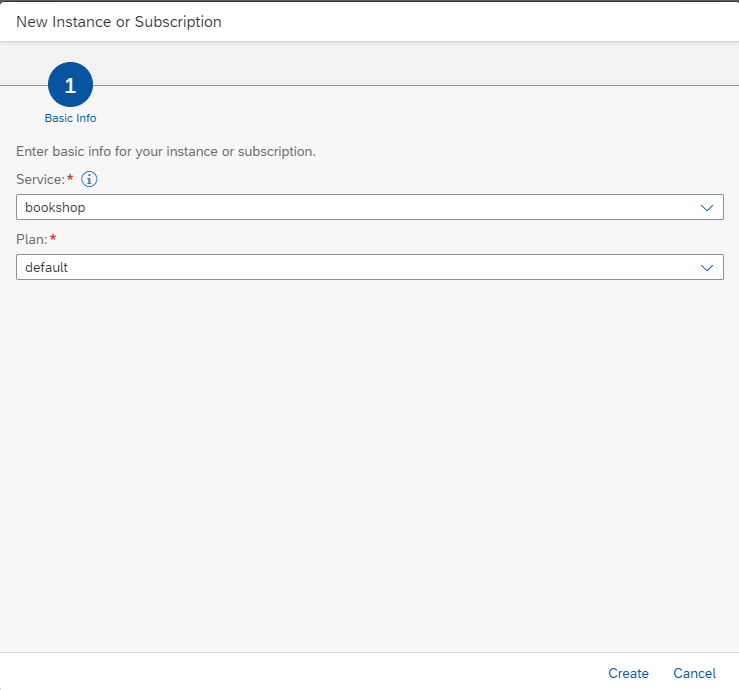
Learn more about subscribing to a SaaS application using the SAP BTP cockpit.Learn more about subscribing to a SaaS application using the btp CLI.
You can now access your subscribed application via Go to Application.

As you can see, your route doesn't exist yet. You need to create and map it first.
If you're deploying to Kyma, your application will load and you won't get the below error. You can skip the step of exposing the route.
404 Not Found: Requested route ('...') does not exist.Leave the window open. You need the information to create the route.
Cloud Foundry
Use the following command to create and map a route to your application:
cf map-route ‹app› ‹paasDomain› --hostname ‹subscriberSubdomain›-‹saasAppName›In our example, let's assume our saas-registry is configured in the mta.yaml like this:
- name: bookshop-registry
  type: org.cloudfoundry.managed-service
  parameters:
    service: saas-registry
    service-plan: application
    config:
      appName: bookshop-${org}-${space} // [!code focus]
Let's also assume we've deployed to our app to Cloud Foundry org myOrg and space mySpace. This would be the full command to create a route for the subaccount with subdomain subscriber1:
cf map-route bookshop cfapps.us10.hana.ondemand.com --hostname subscriber1-myOrg-mySpace-bookshopLearn how to do this in the BTP cockpit instead…
Switch to your provider account and go to your space → Routes. Click on New Route.
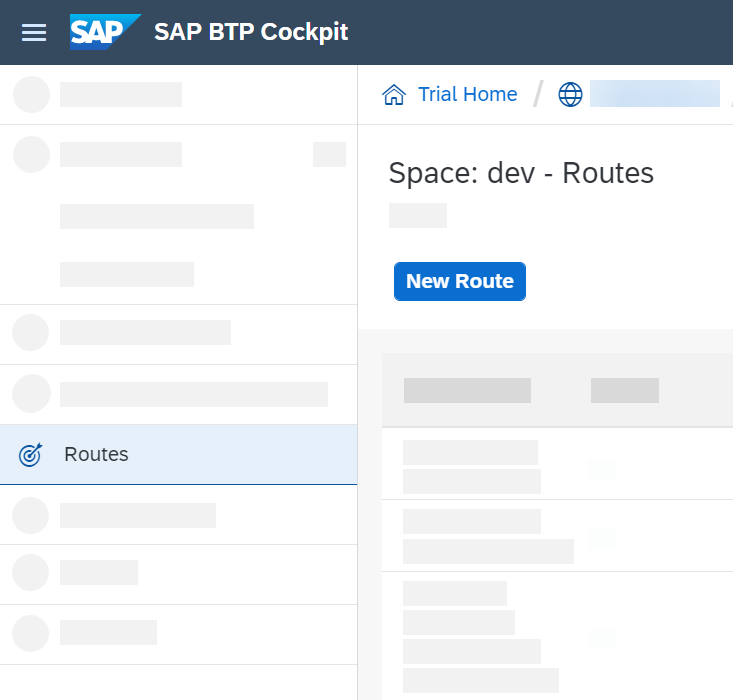
Here, you need to enter a Domain and Host Name.
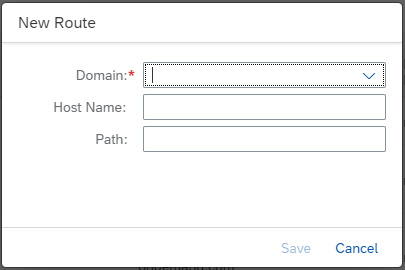
Let's use this route as example:
https://subscriber1-bookshop.cfapps.us10.hana.ondemand.com
- The Domain here is cfapps.us10.hana.ondemand.com
- The Host Name here is subscriber1-bookshop
Hit Save to create the route.
You can now see the route is created but not mapped to an application yet.
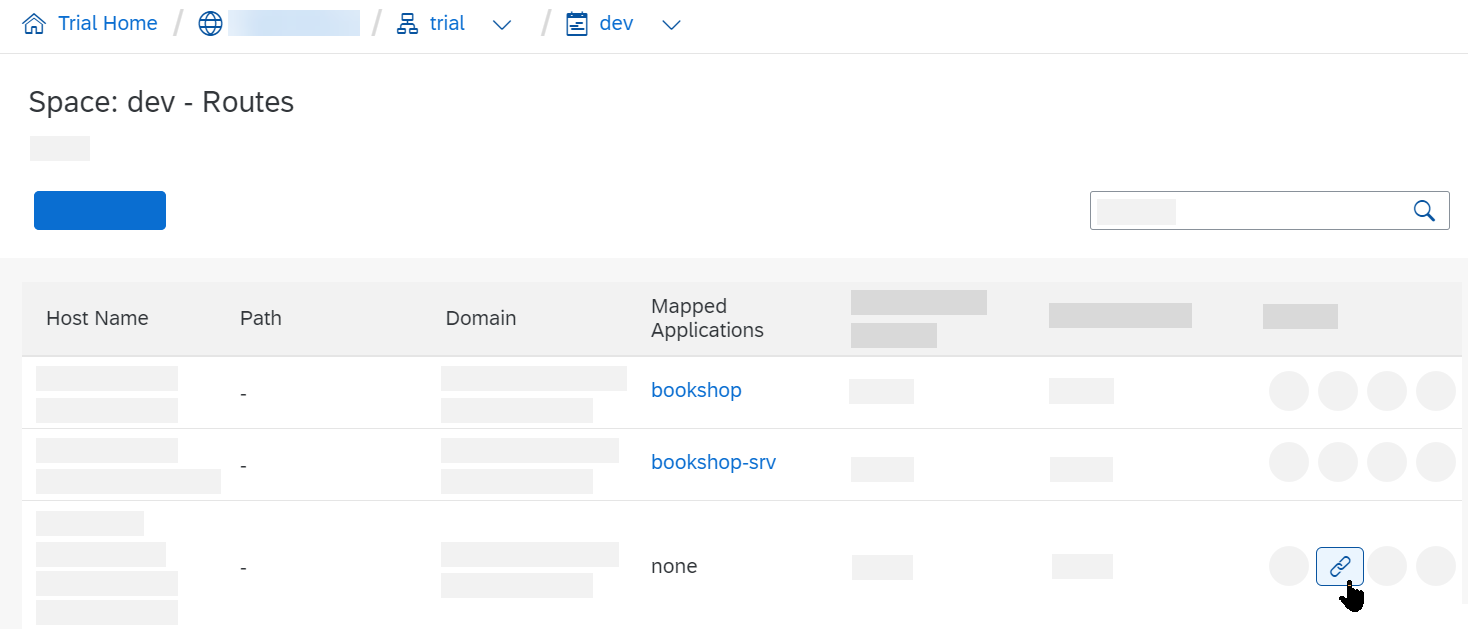
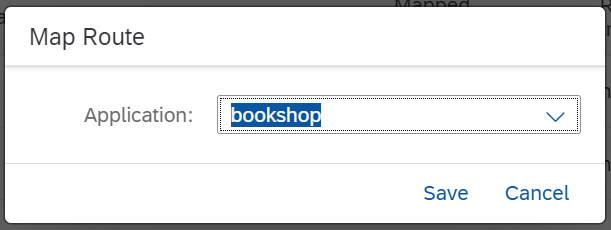
Click on Map Route, choose your App Router module and hit Save.
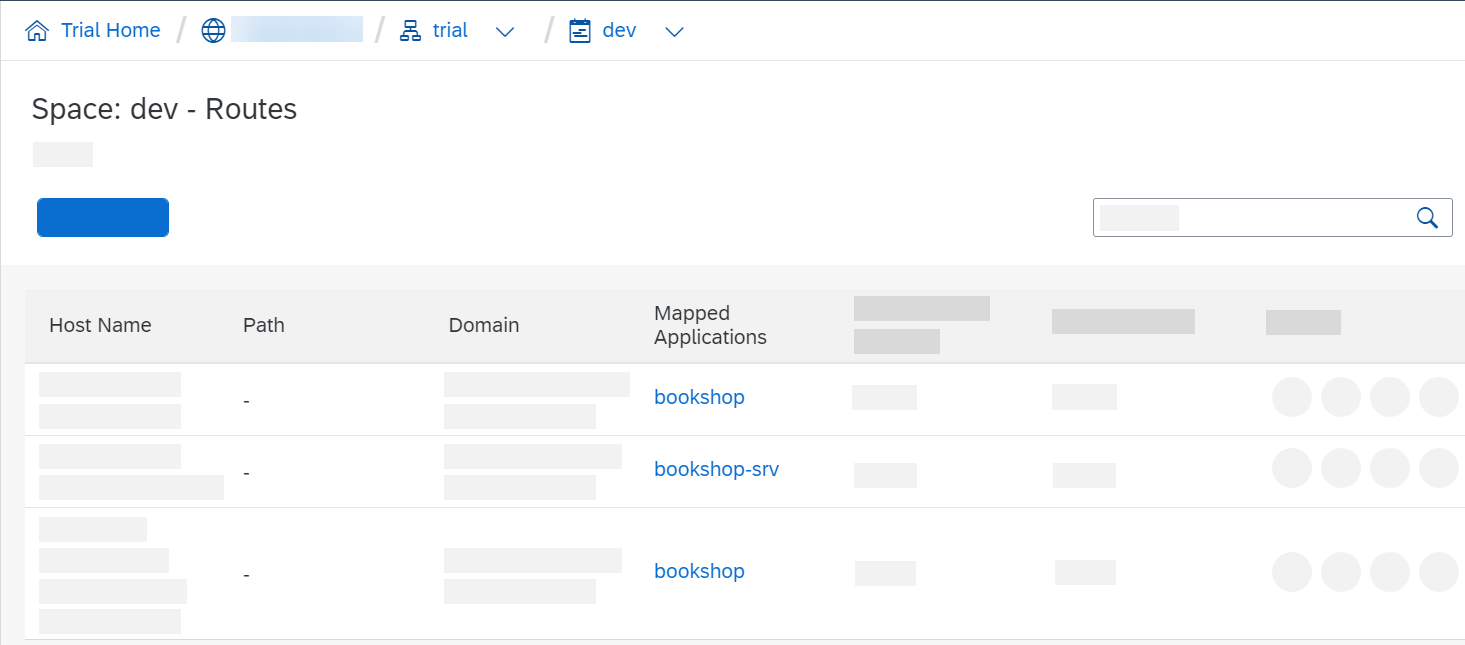
You should now see the route mapped to your application.
Update Database Schema
There are several ways to run the update of the database schema.
MTX Sidecar API
Please check the Upgrade API to see how the database schema update can be run for single or all tenants using the API endpoint.
cds-mtx upgrade Command
The database schema upgrade can also be run using cds-mtx upgrade <tenant|*>. The command must be run in the MTX sidecar root directory.
Run as Cloud Foundry hook
Example definition for a module hook:
hooks:
  - name: upgrade-all
    type: task
    phases:
    # - blue-green.application.before-start.idle
      - deploy.application.before-start
    parameters:
      name: upgrade
      memory: 512M
      disk-quota: 768M
      command: cds-mtx upgrade '*'
Blue-green deployment strategy for MTAs
Manually run as Cloud Foundry Task
You can also invoke the command manually using cf run-task:
cf run-task <app> --name "upgrade-all" --command "cds-mtx upgrade '*'"Test-Drive with Hybrid Setup
For faster turnaround cycles in development and testing, you can run the app locally while binding it to remote service instances created by a Cloud Foundry deployment.
To achieve this, bind your SaaS app and the MTX sidecar to its required cloud services, for example:
cds bind --to-app-services bookshop-srvFor testing the sidecar, make sure to run the command there as well:
cd mtx/sidecar
cds bind --to-app-services bookshop-srv
To generate the SAP HANA HDI files for deployment, go to your project root and run the build:
cds build --productionRun cds build after model changes
Each time you update your model or any SAP HANA source file, you need repeat the build.
Make sure to stop any running CAP servers left over from local testing.
By passing --profile hybrid you can now run the app with cloud bindings and interact with it as you would while testing your app locally. Run this in your project root:
cds watch mtx/sidecar --profile hybridAnd in another terminal:
cd srv
mvn cds:watch -Dspring-boot.run.profiles=hybridcds watch --profile hybridLearn more about Hybrid Testing.
Manage multiple deployments
Use a dedicated profile for each deployment landscape if you are using several, such as dev, test, prod. For example, after logging in to your dev space:
cds bind -2 bookshop-db --profile dev
cds watch --profile dev
SaaS Dependencies
Some of the xsuaa-based services your application consumes need to be registered as reuse services to work in multitenant environments. This holds true for the usage of both the SaaS Registry service and the Subscription Manager Service (SMS).
CAP Java as well as @sap/cds-mtxs, each offer an easy way to integrate these dependencies. They support some services out of the box and also provide a simple API for applications. Most notably, you need such dependencies for the following SAP BTP services: Audit Log, Event Mesh, Destination, HTML5 Application Repository, and Cloud Portal.
For CAP Java, all these services are supported natively and SaaS dependencies are automatically created if such a service instance is bound to the CAP Java application, that is, the srv module.
Explicitly activate the Destination service
SaaS dependency for Destination service needs to be activated explicitly in the application.yaml due to security reasons. SaaS dependencies for some of the other services can be deactivated by setting the corresponding property to false in the application.yaml.
Refer to the cds.multiTenancy.dependencies section in the CDS properties.
For CAP Node.js, all these services are supported natively and can be activated individually by providing configuration in cds.requires. In the most common case, you simply activate service dependencies like so:
"cds": {
  "requires": {
    "audit-log": true,
    "connectivity": true,
    "destinations": true,
    "html5-repo": true,
    "portal": true
  }
}
Defaults provided by @sap/cds-mtxs...
The Boolean values in the mtx/sidecar/package.json activate the default configuration in @sap/cds-mtxs:
"cds": {
  "requires": {
    "connectivity": {
      // Uses credentials.xsappname
      "vcap": { "label": "connectivity" },
      "subscriptionDependency": "xsappname"
    },
    "portal": {
      "vcap": { "label": "portal" },
      // Uses credentials.uaa.xsappname
      "subscriptionDependency": {
        "uaa": "xsappname"
      }
    },
    ...
  }
}
Additional Services
In CAP Java, if your application uses a service that isn't supported out of the box, you can define dependencies by providing a custom handler.
Learn more about defining dependent services
In CAP Node.js, you can use a custom subscriptionDependency entry in your application's or CAP plugin's package.json:
"cds": {
  "requires": {
    "my-service": {
      "subscriptionDependency": "xsappname"
    }
  }
}
The
subscriptionDependencyspecifies the property name of the credentials value with the desiredxsappname, starting fromcds.requires['my-service'].credentials. Usually it's just"xsappname", but JavaScript objects interpreted as a key path are also allowed, such as{ "uaa": "xsappname" }in the defaults example forportal.
Alternatively, overriding the dependencies handler gives you full flexibility for any custom implementation.
Add Custom Handlers
MTX services are implemented as standard CAP services, so you can register for events just as you would for any application service.
In the Java Main Project
For Java, you can add custom handlers to the main app as described in the documentation:
@After
private void subscribeToService(SubscribeEventContext context) {
   String tenant = context.getTenant();
   Map<String, Object> options = context.getOptions();
}

@On
private void upgradeService(UpgradeEventContext context) {
   List<String> tenants = context.getTenants();
   Map<String, Object> options = context.getOptions();
}

@Before
private void unsubscribeFromService(UnsubscribeEventContext context) {
   String tenant = context.getTenant();
   Map<String, Object> options = context.getOptions();
}
In the Sidecar Subproject
You can add custom handlers in the sidecar project, implemented in Node.js.
cds.on('served', () => {
  const { 'cds.xt.DeploymentService': ds } = cds.services
  ds.before('subscribe', async (req) => {
    // HDI container credentials are not yet available here
    const { tenant } = req.data
  })
  ds.before('upgrade', async (req) => {
    // HDI container credentials are not yet available here
    const { tenant } = req.data
  })
  ds.after('deploy', async (result, req) => {
    const { container } = req.data.options
    const { tenant } = req.data
    ...
  })
  ds.after('unsubscribe', async (result, req) => {
    const { container } = req.data.options
    const { tenant } = req.data
  })
})
Configuring the Java Service
cds add multitenancy added configuration similar to this:
modules:
  - name: bookshop-srv
    type: java
    path: srv
    parameters:
      ...
    provides:
      - name: srv-api # required by consumers of CAP services (e.g. approuter)
        properties:
          srv-url: ${default-url}
    requires:
      - name: app-api
        properties:
          CDS_MULTITENANCY_APPUI_URL: ~{url}
          CDS_MULTITENANCY_APPUI_TENANTSEPARATOR: "-"
      - name: bookshop-auth
      - name: bookshop-db
      - name: mtx-api
        properties:
          CDS_MULTITENANCY_SIDECAR_URL: ~{mtx-url}
- name: bookshop-registry...
srv:
bindings:
...
image:
repository: bookshop-srv
env:
SPRING_PROFILES_ACTIVE: cloud
CDS_MULTITENANCY_APPUI_TENANTSEPARATOR: "-"
CDS_MULTITENANCY_APPUI_URL: https://{{ .Release.Name }}-srv-{{ .Release.Namespace }}.{{ .Values.global.domain }}
CDS_MULTITENANCY_SIDECAR_URL: https://{{ .Release.Name }}-sidecar-{{ .Release.Namespace }}.{{ .Values.global.domain }}
...CDS_MULTITENANCY_SIDECAR_URLsets the application propertycds.multitenancy.sidecar.url. This URL is required by the CAP Java runtime to connect to the MTX Sidecar application and is derived from the propertymtx-urlof the mtx-sidecar module.CDS_MULTITENANCY_APPUI_URLsets the entry point URL that is shown in the SAP BTP Cockpit.CDS_MULTITENANCY_APPUI_TENANTSEPARATORis the separator in generated tenant-specific URL.
The tenant application requests are separated by the tenant-specific app URL:
https://<subaccount subdomain><CDS_MULTITENANCY_APPUI_TENANTSEPARATOR><CDS_MULTITENANCY_APPUI_URL>Use MTA extensions for landscape-specific configuration
You can define the environment variable CDS_MULTITENANCY_APPUI_TENANTSEPARATOR in an MTA extension descriptor:
_schema-version: "3.1"
extends: my-app
ID: my-app.id
modules:
  - name: srv
    properties:
      CDS_MULTITENANCY_APPUI_TENANTSEPARATOR: "-"
  - name: app
    properties:
TENANT_HOST_PATTERN: ^(.*)-${default-uri}Option: Provisioning Only
Under certain conditions it makes a lot of sense to use the MTX Sidecar only for tenant provisioning. This configuration can be used in particular when the application doesn't offer (tenant-specific) model extensions and feature toggles. In such cases, business requests can be served by the Java runtime without interaction with the sidecar, for example to fetch an extension model.
Use the following MTX Sidecar configuration to achieve this:
{
    "requires": {
        "multitenancy": true,
        "extensibility": false,
        "toggles": false
    },
    "build": {
        ...
    }
}
In this case, the application can use its static local model without requesting the MTX sidecar for the model. This results in a significant performance gain because CSN and EDMX metadata are loaded from the JAR instead of the MTX Sidecar. To make the Java application aware of this setup as well, set the following properties:
cds:
  model:
    provider:
      extensibility: false // [!code focus]
      toggles: false // [!code focus]
Enable only the features that you need
You can also selectively use these properties to enable only extensibility or feature toggles, thus decreasing the dimensions when looking up dynamic models.
Appendix
About SaaS Applications
Software-as-a-Service (SaaS) solutions are deployed once by a SaaS provider, and then used by multiple SaaS customers subscribing to the software.
SaaS applications need to register with the SAP BTP SaaS Provisioning service to handle subscribe and unsubscribe events. In contrast to single-tenant deployments, databases or other tenant-specific resources aren't created and bootstrapped upon deployment, but upon subscription per tenant.
CAP includes the MTX services, which provide out-of-the-box handlers for subscribe/unsubscribe events, for example to manage SAP HANA database containers.
If everything is set up, the following graphic shows what's happening when a user subscribes to a SaaS application:
- The SaaS Provisioning Service sends a
subscribeevent to the CAP application. - The CAP application delegates the request to the MTX services.
- The MTX services use Service Manager to create the database tenant.
- The CAP Application connects to this tenant at runtime using Service Manager.
In CAP Java, tenant provisioning is delegated to CAP Node.js based services. This has the following implications:
- Java applications need to run and maintain the cds-mtxs module as a sidecar application (called MTX sidecar in this documentation).
- But multitenant CAP Java applications automatically expose the tenant provisioning API called by the SaaS Provisioning service so that custom logic during tenant provisioning can be written in Java.
About Sidecar Setups
The SaaS operations subscribe and upgrade tend to be resource-intensive. Therefore, it's recommended to offload these tasks onto a separate microservice, which you can scale independently of your main app servers.
Java-based projects even require such a sidecar, as the MTX services are implemented in Node.js.
In these MTX sidecar setups, a subproject is added in ./mtx/sidecar, which serves the MTX Services as depicted in the illustration below.
The main task for the MTX sidecar is to serve subscribe and upgrade requests.
The CAP services runtime requests models from the sidecar only when you apply tenant-specific extensions. For Node.js projects, you have the option to run the MTX services embedded in the main app, instead of in a sidecar.
Behind the Scenes
With adding the MTX services, your project configuration is adapted at all relevant places.
Configuration and dependencies are added to your package.json and an xs-security.json containing MTX-specific scopes and roles is created.
Configuration and dependencies are added to your .cdsrc.json and an xs-security.json containing MTX-specific scopes and roles is created.
For the MTA deployment service dependencies are added to the mta.yaml file. Each SaaS application will have bindings to at least three SAP BTP service instances.
| Service | Description |
|---|---|
Service Manager (service-manager) | CAP uses this service for creating a new SAP HANA Deployment Infrastructure (HDI) container for each tenant and for retrieving tenant-specific database connections. |
SaaS Provisioning Service (saas-registry) | To make a SaaS application available for subscription to SaaS consumer tenants, the application provider must register the application in the SAP BTP Cloud Foundry environment through the SaaS Provisioning Service. |
User Account and Authentication Service (xsuaa) | Binding information contains the OAuth client ID and client credentials. The XSUAA service can be used to validate the JSON Web Token (JWT) from requests and to retrieve the tenant context from the JWT. |
Next Steps
- See the MTX Services Reference for details on service and configuration options, in particular about sidecar setups.
- See our guide on Extending and Customizing SaaS Solutions.