
CAP-level Users & Roles
This guide is available for Node.js and Java.
Use the toggle in the title bar or press v to switch.
This guide introduces CAP user abstraction and role assignments.
CAP User Abstraction
A successful authentication results in a CAP user representation reflecting the request user in a uniform way. Referring to the key concepts, the abstraction serves to completely decouple authorization and business logic from pluggable authentication strategies. It contains static information about the user such as name, ID, and tenant. Additionally, it contains claims such as roles or assigned attributes that are relevant for authorization.

After successful authentication, a CAP user is mainly represented by the following properties:
- Logon name identifying the user uniquely
- Tenant describes the tenant of the user (subscriber or provider) that implies the CDS model and business data container.
- Roles the user has been assigned by a user administrator (business user roles) or roles that are derived by the authentication level (pseudo roles).
- Attributes the user has been assigned, for example, for instance-based authorization.
The user information is reflected in the UserInfo object attached to the request.
The user information is reflected in req.user and req.tenant attached to the request.
User Types
CAP users can be classified in multiple dimensions:
Business users vs. technical users:
- Business users represent identifiable end users who log in to interact with the system.
- Technical users operate on behalf of an entire tenant at a technical API level.
Authenticated users vs. anonymous users
- Authenticated users have successfully completed authentication by presenting valid credentials (for example, a token).
- Anonymous users are unidentifiable in general, as they usually don't present any credentials.
Provider vs. subscriber tenant
- The provider tenant includes all users of the application owner.
- A subscriber tenant includes all users of a dedicated application customer.
Usually, the provider tenant is not subscribed to a multitenant application and therefore has no business users. There are technical users for the provider and for all subscribers.
| Multitenant Application | Business users | Technical user |
|---|---|---|
| Provider Tenant | - | ✓ |
| Subscriber Tenants | ✓ | ✓ |
In contrast, for a single-tenant application, the provider tenant coincides with the only subscriber tenant and therefore contains all business users.
| Single-Tenant Application | Business users | Technical user |
|---|---|---|
| Provider (=subscriber) Tenant | ✓ | ✓ |
Info
Apart from anonymous users, all users have a unique tenant.
The user types are designed to support various flows, such as:
- UI requests executed on behalf of a business user interacting with the CAP backend service.
- Backend processing that utilizes platform services on behalf of the technical user of the subscriber tenant.
- Asynchronously received messages that process data on behalf of the technical user of a subscriber tenant.
- Background tasks that operate on behalf of the technical user of the provider tenant.
- etc.
Find more details about how to switch the user context during request processing.
Roles
CAP roles, which are defined on CDS resources such as services and entities, down to the events allowed on them, form the basis of static access control. Technically, the request user is restricted to the resources for which an appropriate CAP role is assigned. Such roles should reflect basic operations performed by users interacting with the application.
In the following example, there are two different basic operations defined on domain level:
ReportIssuesdescribes users who view existing issues, report new issues and confirm provided solutions.ProcessIssuesdescribes users who process issues. They also write notes for customers.
annotate Issues with @(restrict: [
    { grant: ['READ','report', 'confirm'], to: 'ReportIssues' },
    { grant: ['READ', 'WRITE'], to: 'ProcessIssues' }
]);

annotate Notes with @(restrict: [
    { grant: ['READ'] }, // any
    { grant: ['READ', 'WRITE'], to: 'ProcessIssues' }
]);
CAP roles represent basic building blocks of authorization rules that are defined by application developers at design time. Independently of that, user administrators combine CAP roles in higher-level policies and assign them to business users in the platform's central authorization management solution at runtime.
Dynamic assignments of roles to users can be done by
Info
CDS-based authorization deliberately avoids technical concepts, such as scopes in OAuth, in favor of user roles, which are closer to the business domain of applications.
Pseudo Roles
Often it is useful to define access rules that aren't based on an application-specific user role, but rather on the technical authentication level of the request that can be mapped to a pre-defined CAP role. For instance, a service should be accessible only for technical users, with or without user propagation. Such roles are called pseudo roles as they aren't assigned by user administrators, but are added by the runtime automatically on successful authentication, reflecting the technical level:
| Pseudo Role | User Type | Technical Indicator | User Name ($user) |
|---|---|---|---|
authenticated-user | - | successful authentication | derived from the token |
any | - | - | derived from the token if available or anonymous |
system-user | technical | grant type client credential | system |
internal-user | technical | grant type client credential and shared identity instance | system-internal |
| Pseudo Role | User Type | Technical Indicator | User Name |
|---|---|---|---|
authenticated-user | n/a | successful authentication | derived from the token |
any | n/a | n/a | derived from the token if available or anonymous |
system-user | technical | grant type client credential | system |
internal-user | technical | grant type client credential and shared identity instance | system |
The pseudo-role system-user allows you to separate access by business users from technical clients. Note that this role does not distinguish between any technical clients sending requests to the API.
Pseudo-role internal-user allows to define application endpoints that can be accessed exclusively by the own provider tenant on technical level. In contrast to system-user, the endpoints protected by this pseudo-role do not allow requests from any external technical clients. Hence it is suitable for technical intra-application communication, see Security > Application Zone.
Warning
All technical clients that have access to the application's XSUAA or IAS service instance can call your service endpoints as internal-user. Refrain from sharing this service instance with untrusted clients, for instance by passing services keys or SAP BTP Destination Service instances.
Model References
The object representation of the resolved CAP user is attached to the current request context and has an impact on the request flow, for instance with regard to
- authorizations
- enriching business data with user data
- setting database session variables
In the CDS model, some of the user properties can be referenced in annotations or static views:
| User Property | CDS Model Reference | CDS Artifact |
|---|---|---|
| Name | $user | annotations and static views |
| Attribute | $user.<attribute> | @restrict |
| Role | <role> | @requires and @restrict.to |
Tracing
To track down issues during development, it can help to trace the properties of the request user to the application log.
You can activate user tracing by setting logger com.sap.cds.security.authentication to log level DEBUG:
logging:
  level:
    com.sap.cds.security.authentication: DEBUG
This will result in trace output like
Resolved MockedUserInfo [id='mock/admin', name='admin', roles='[admin]', attributes='{tenant=[null]}'for mock users or
c.s.c.f.i.IdentityUserInfoProvider : Resolved XsuaaUserInfo [id='be72646e-279a-4f96-ae40-05989a46b43b', name='max.muster@sap.com', roles='[openid, admin]', attributes='
{tenant=[b2c463bd-da56-488c-8345-2632905acde3]}'
for XSUAA users.
You can activate user tracing by setting log level cds.log.levels.auth: "debug":
{
  "cds": {
    "log": {
      "levels": {
        "auth": "debug"
      }
    }
  }
}
This will result in trace output like
[basic] - 401 > login required
[basic] - authenticated: { user: 'alice', tenant: ..., features: [ ... ] }
for mock users.
Warning
Refrain from activating user tracing in productive systems.
Role Assignment with AMS
CAP applications that use the Identity Authentication Service (IAS) for authentication can leverage the Authorization Management Service (AMS) to provide comprehensive authorization. Similar to IAS, AMS is part of the SAP Cloud Identity Services (SCI).
Why is AMS required? Unlike tokens issued by XSUAA, IAS tokens only contain static user information and cannot directly provide CAP roles. AMS acts as a central service to define access policies that include CAP roles and additional filter criteria for instance-based authorizations in CAP applications. Business users, technically identified by the IAS ID token, can have AMS policies assigned by user administrators.
Info
Authorizations for technical users can't be addressed by AMS policies yet.
The integration with AMS is provided as an easy-to-use plugin for CAP applications. At the time of the request, the AMS policies assigned to the request user are evaluated by the CAP AMS plugin, and the CAP roles and filters are applied to the request context accordingly. This is illustrated in the following diagram:
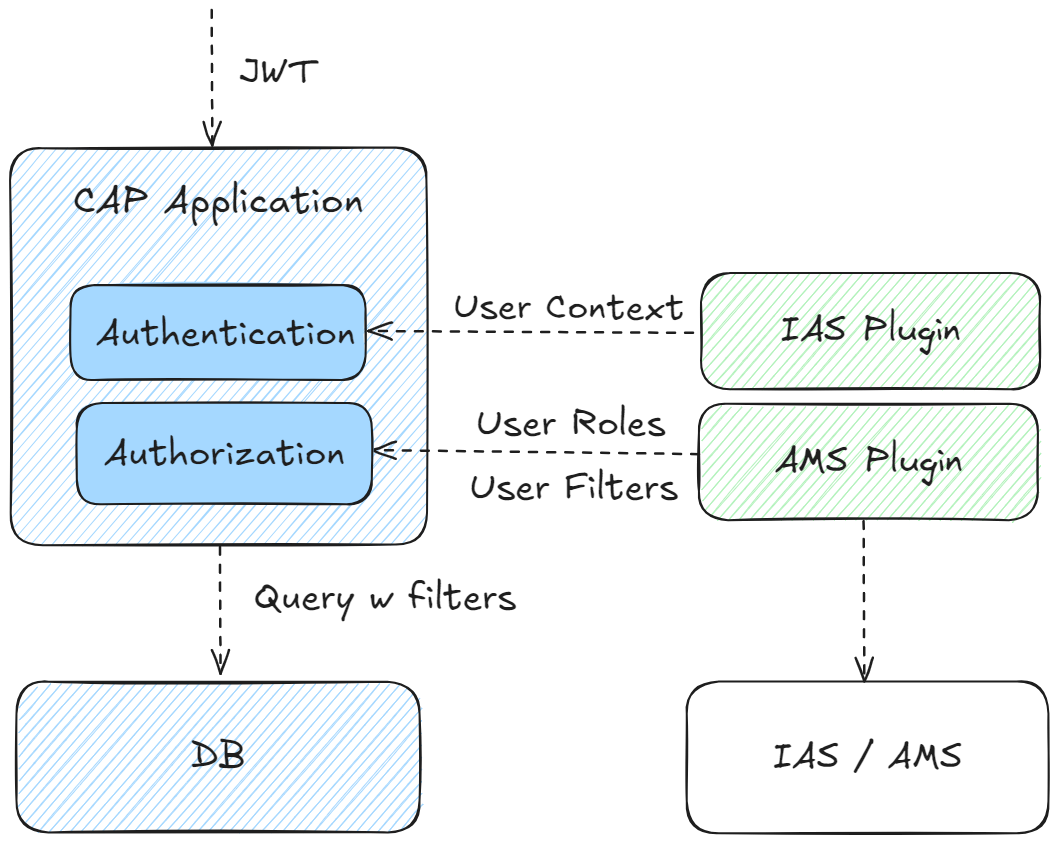
The interaction between the CAP application and AMS (via plugin) is as follows:
- IAS-Authentication is performed independently as a pre-step.
- The plugin injects user roles and filters according to AMS policies assigned to the current request user.
- CAP performs the authorization on the basis of the CDS authorization model and the injected user claims.
Adding AMS Support
AMS is transparent to CAP application code and can be easily consumed via plugin dependency.
To enhance your project with AMS, you can make use of CDS CLI tooling:
cds add amsThis automatically adds required configuration for AMS, taking into account the concrete application context (tenant mode and runtime environment etc.). If required, it also runs the new cds add ias command to configure the project for IAS authentication.
See dependencies added
<properties>
  <sap.cloud.security.ams.version>3.8.1</sap.cloud.security.ams.version>
</properties><dependencies>
<dependency>
<groupId>com.sap.cloud.security.ams.client</groupId>
<artifactId>jakarta-ams</artifactId>
<version>${sap.cloud.security.ams.version}</version>
</dependency>
<dependency>
<groupId>com.sap.cloud.security.ams.client</groupId>
<artifactId>cap-ams-support</artifactId>
<version>${sap.cloud.security.ams.version}</version>
</dependency>
</dependencies><plugins>
<plugin>
<groupId>com.sap.cds</groupId>
<artifactId>cds-maven-plugin</artifactId>
<executions>
<execution>
<id>cds.build</id>
<goals>
<goal>cds</goal>
</goals>
<configuration>
<commands>
[...]
<command>build --for ams</command>
</commands>
</configuration>
</execution>
</plugin>
<plugin>
<groupId>com.sap.cloud.security.ams.client</groupId>
<artifactId>dcl-compiler-plugin</artifactId>
<version>${sap.cloud.security.ams.version}</version>
<executions>
<execution>
<id>compile</id>
<goals>
<goal>compile</goal>
</goals>
<configuration>
<sourceDirectory>${project.basedir}/src/main/resources/ams</sourceDirectory>
<dcn>true</dcn>
<dcnParameter>pretty</dcnParameter>
<compileTestToDcn>true</compileTestToDcn>
</configuration>
</execution>
</executions>
</plugin>
</plugins>These libraries integrate into the CAP framework to handle incoming requests. Based on the user's assigned policies, the user's roles are determined and written to the UserInfo object. The framework then authorizes the request as usual based on the user's roles.
Node.js plugin @sap/ams added to the project
{
  "devDependencies": {
    "@sap/ams": "^3"
  }
}
The @sap/ams plugin provides multiple build-time features:
- Validate
ams.attributesannotations for type coherence against the AMS schema. - Generate policies from the CDS model during the build using a custom build task.
- Generate a deployer application during the build to upload the Data Control Language (DCL) base policies.
AM provides highly flexible APIs to define and enforce authorization rules at runtime. A relevant subset of these APIs is consumed by CAP apps by way of the AMS CAP integration plugin.
Warning
Make sure not to mix native AMS APIs with those provided by the CAP plugin.
Adding AMS Support
AMS is transparent to CAP application code and can be easily consumed via plugin dependency.
To enhance your project with AMS, you can make use of CDS CLI tooling:
cds add amsThis automatically adds required configuration for AMS, taking into account the concrete application context (tenant mode and runtime environment etc.). If required, it also runs the new cds add ias command to configure the project for IAS authentication.
See dependencies added
{
  "dependencies": [
    "@sap/ams": "^3",
    "@sap/xssec": "^4"
  ],
  "devDependencies": [
    "@sap/ams-dev": "^2"
}
@sap/ams integrates into the CAP framework to handle incoming requests. Based on the user's assigned policies, the user's roles are determined to decorate the user.is function with additional roles. The framework then authorizes the request as usual based on the user's roles.
For local development, @sap/ams-dev needs to compile the DCL files to Data Control Notation (DCN) files in gen/dcn which is the machine-readable version of DCL that is required by AMS at runtime.
Additionally, @sap/ams provides multiple build-time features:
- Validate
ams.attributesannotations for type coherence against the DCL schema. - Generate policies from the CDS model during the build using a custom build task.
- Generate a deployer application during the build to upload the Data Control Language (DCL) base policies.
Tip
In general, AMS provides highly flexible APIs to define and enforce authorization rules at runtime suitable for native Cloud applications. In the context of CAP projects, only a limited subset of these APIs is relevant and is offered in a streamlined way via the CAP integration plugins.
Prepare CDS Model
On the level of application domain, you can declaratively introduce access rules in the CDS model, enabling higher-level interaction flows with the entire application domain:
- a CAP role for AMS can span multiple services and entities, providing a holistic perspective on how a user interacts with the domain data.
- a CAP attribute for AMS is typically cross-sectional and hence is defined on a domain-global level.
The CDS model is fully decoupled from AMS policies which are defined on business level on top by external administrators. Hence, the rules in the CAP model act as basic building blocks for higher-level business rules and therefore should have appropriate granularity.
CAP Roles for AMS
You can define CAP roles in the CDS model as described before.
Tip
A CAP role describes a capability on technical domain level defined by application developers. In contrast, an AMS policy reflects a coarser-grained business role on application level defined by user administrators.
Imagine you want to provide two different CAP roles in the bookshop example: ManageAuthors allows users to manage the authors of the books being sold. Users with ManageBooks work only with the book inventory. As each book has an association to an author, they can only manage books from authors that have already been created before:
service AdminService @(requires: ['ManageAuthors', 'ManageBooks']) {

  entity Books @(restrict: [
    { grant: ['READ'], to: 'ManageAuthors' },
    { grant: ['READ', 'WRITE'], to: 'ManageBooks' } ])
  as projection on my.Books;

  entity Authors @(restrict: [
    { grant: ['READ', 'WRITE'], to: 'ManageAuthors' },
    { grant: ['READ'], to: 'ManageBooks' } ])
  as projection on my.Authors;
}
Both CAP roles are ready to be used in higher-level AMS policies.
Tip
You can simply reuse existing CAP roles for AMS. There is no need to modify the CDS model.
Learn more about role-based authorizations in CAP
CAP Attributes for AMS
Attributes for AMS offer user administrators an additional layer of flexibility to partition domain entities into smaller, more manageable units for access control. The domain attributes, which are exposed to user administrators for defining custom filter conditions, must be predefined by the application developer in the CDS model using the @ams annotation.
For example, the instances of entity Books can be classified by the associated genre. Hence, genre.name appears to be a suitable AMS attribute value, exposed under the name Genre:
annotate AdminService.Books with @ams.attributes: {
  Genre: (genre.name)
};
In general, the @ams annotation operates on the entity level. The value of the AMS attribute needs to point to a single-value property of the target entity (paths are supported). You need to make use of a compiler expression to ensure validity of the value reference.
Tip
Choose attributes exposed to AMS carefully. Attributes you choose should have cross-sectional semantics in the domain.
As such attributes are usually shared by multiple entities, it is convenient to add the @ams-annotation at the level of a shared aspect as sketched here:
@ams.attributes: { Genre: (genre.name) }
aspect withGenre {
    genre : Association to Genres;
}

entity Books : withGenre { ... }
Prepare Base Policies
CAP roles and attribute filters cannot be directly assigned to business users. Instead, the application defines AMS base policies that include CAP roles and attributes at design time. This allows user administrators to assign them to users or create custom policies based on the base policies at runtime.
Tip
AMS policies represent the business-level roles of end users interacting with the application. Often, they reflect real-world jobs or functions.
After the application is built, check the srv/src/main/resources/ams folder to see the generated AMS schema and a basePolicies DCL file in a package called cap
└─ ams
   ├─ cap
   │  └─ basePolicies.dcl
   └─ schema.dcl
After the application is built, check the ams/dcl folder to see the generated AMS schema and a basePolicies DCL file in a package called cap:
└─ dcl
   ├─ cap
   │  └─ basePolicies.dcl
   └─ schema.dcl
Learn more about policy generation
The generated policies are a good starting point to add manual modifications.
The generated DCL schema includes all AMS attributes exposed for filtering:
SCHEMA {
  Genre : String
}
In the schema you may additionally configure value help for the attributes in the Cockpit UI for AMS.
You can modify the generated policies according to your needs. For example, you can rename the policies to reflect appropriate job functions and adjust the referenced CAP roles:
POLICY StockManager {
  ASSIGN ROLE ManageBooks WHERE Genre IS NOT RESTRICTED;
}

POLICY ContentManager {
  ASSIGN ROLE ManageAuthors;
  ASSIGN ROLE ManageBooks;
}
In contrast to a StockManager who is responsible for the books offering, a ContentManager additionally makes the author selection. In addition, a StockManager with CAP role ManageBooks may be restricted to specific genres by applying appropriate filters prepared in custom policies. As a ContentManager there is no genre-based restriction.
Info
The attribute statement is defined in the scope of a dedicated CAP role and filters are applied on matching entites accordingly.
Local Testing
Although the AMS policies are not yet deployed to the Cloud service, you can assign policies to mock users and run locally:
cds:
  security:
    mock:
      users:
        content-manager:
          policies:
            - cap.ContentManager
        stock-manager:
          policies:
- cap.StockManager{
"cds": {
"requires": {
"auth": {
"[development]": {
"kind": "mocked",
"users": {
"content-manager": {
"policies": [
"cap.ContentManager"
]
},
"stock-manager": {
"policies": [
"cap.StockManager"
]
}
}
}
}
}
}Tip
Don't forget to refer to fully qualified policy names including the package name (cap in this example).
Now (re)start the application with
mvn spring-boot:runcds watchand verify in the UI for AdminService (http://localhost:8080/index.html#Books-manage) that the the assigned policies imply the expected static access rules:
You can now verify that the assigned policies enforce the expected access rules:
- mock user
content-managerhas full access toBooksandAuthors. - mock user
stock-managercan readBooksandAuthorsand can editBooks(but notAuthors).
For the advanced test scenario, you can define custom policies in pre-defined package local that is ignored during deployment of the policies to the Cloud service and hence will not show up in production.
Let's add a custom policy StockManagerFiction which is based on base policy cap.StockManager restricting the assigned users to the genres Mystery and Fantasy:
POLICY StockManagerFiction {
    USE cap.StockManager RESTRICT Genre IN ('Mystery', 'Fantasy');
}
You can define valid attribute values in complex DCL expressions.
Don't miss to add the policy files in sub folders of ams reflecting the namespace properly: Policy local.StockManagerFiction is expected to be in a file within directory /ams/local/*.
The assignment to mock users is done in the policies property:
cds:
  security:
    mock:
      users:
        stock-manager-test:
          policies:
            - local.StockManagerFiction
You can verify in the UI that mock user stock-manager-test is restricted to books of genres Mystery and Fantasy.
Tip
Don't miss to add the policy files in sub folders of ams/dcl reflecting the namespace properly: Policy local.StockManagerFiction is expected to be in a file within directory ./ams/dcl/local/.
{
  "cds": {
    "requires": {
      "auth": {
        "[development]": {
          "kind": "mocked",
          "users": {
            "stock-manager-test": {
              "policies": [
                "local.StockManagerFiction"
              ]
            }
          }
        }
      }
    }
  }
}
Learn more about AMS attribute filters with CAP
Cloud Deployment
If not done yet, prepare your project Cloud deployment as explained before.
Policies can be automatically deployed to the AMS server during deployment of the application by means of AMS deployer provided by module @sap/ams.
Enhancing the project by cds add ams automatically adds task e.g. in the MTA for AMS policy deployment.
AMS policy deployer task in the MTA
- name: bookshop-ams-policies-deployer
   type: javascript.nodejs
   path: srv/src/gen/policies # Node.js: gen/policies
   parameters:
     buildpack: nodejs_buildpack
     no-route: true
     no-start: true
     tasks:
       - name: deploy-dcl
         command: npm start
         memory: 512M
   requires:
     - name: bookshop-ias
[...]{
"name": "ams-dcl-content-deployer",
"version": "3.0.0",
"dependencies": {
"@sap/ams": "^3"
},
[...]
"scripts": {
"start": "npx --package=@sap/ams deploy-dcl"
}
}Note that the policy deployer task requires a path to a directory structure containing the ams root folder with the policies to be deployed. By default, the path points to srv/src/gen/policies that is prepared automatically during build step with the appropriate policy-content copied from srv/src/main/resources/ams. In addition, @sap/ams needs to be referenced to add the deployer logic.
AMS policy deployer task in the MTA
- name: bookshop-ams-policies-deployer
   type: javascript.nodejs
   path: gen/policies
   parameters:
     buildpack: nodejs_buildpack
     no-route: true
     no-start: true
     tasks:
       - name: deploy-dcl
         command: npm start
         memory: 512M
   requires:
     - name: bookshop-ias
[...]{
"name": "ams-dcl-content-deployer",
"version": "3.0.0",
"dependencies": {
"@sap/ams": "^3"
},
[...]
"scripts": {
"start": "npx --package=@sap/ams deploy-dcl"
}
}Note that the policy deployer task requires a path to a directory structure containing the ams/dcl root folder with the policies to be deployed. By default, the path points to gen/policies that is prepared automatically during build step with the appropriate policy-content copied from ams/dcl. In addition, @sap/ams needs to be referenced to add the deployer logic.
Tip
Several microservices sharing the same IAS instance need a common folder structure the deployer task operates on. It contains the common view of policies applied to all services.
Let's deploy and start the application with
cds upAfterwards, you can now perform the following tasks in the Administrative Console for the IAS tenant (see prerequisites here):
- Assign (base or custom) policies to IAS users
- Create custom policies
To create a custom policy with filter restrictions, follow these steps:
- Select Applications & Resources > Applications. Pick the IAS application of your project from the list.
- In Authorization Policies select Create > Create Restriction. Choose an appropriate policy name, for example,
StockManagerFiction. - Customize the filter conditions for the available AMS attributes.
- Confirm with Save.
Create custom AMS policy with filter condition


Learn more about how to create custom AMS policies
To assign a policy to an IAS user, follow these steps:
- Select Applications & Resources > Applications. Pick the IAS application of your project from the list.
- Switch to tab Authorization Policies and select the policy you want to assign.
- In Assignments, add the IAS user of the tenant to which the policy should be assigned (you can review the policy definition in Rules).
Learn more about how to edit custom AMS policies
Assign AMS policy to an IAS user


You can log on to the bookshop test application with the test user and check that only books of dedicated genres can be modified.
Learn more about AMS policy assignment
Tracing
You can verify a valid configuration of the AMS plugin by the following log output:
c.s.c.s.a.c.AmsRuntimeConfiguration : Configured AmsUserInfoProvider[ams] - AMS Plugin loaded.
[ams] - Added AMS middleware after 'auth' middleware.In addition, for detailed analysis of issues, you can set AMS logger to DEBUG level:
logging:
    level:
com.sap.cloud.security.ams: DEBUG{
"cds": {
"log": {
"levels": {
"ams": "DEBUG"
}
}
}
}which gives you more information about the policy evaluation at request time:
c.s.c.s.a.l.PolicyEvaluationSlf4jLogger  : Policy evaluation result: {...,
"unknowns":"[$app.Genre]", "$dcl.policies":"[local.StockManagerFiction]",
 ...
"accessResult":"or( eq($app.Genre, "Mystery") eq($app.Genre, "Fantasy") )"}.[ams] - Determined potential actions for resource '$SCOPES': stock-manager {
potentialActions: Set(1) { 'stock-manager' },
policies: [ 'local.StockManagerFiction' ],
...
}
[ams] - AMS user roles added to user.is: [ 'stock-manager' ]
[ams] - Privilege check for 'stock-manager' on '$SCOPES' was conditional. {
result: 'conditional',
dcn: "$app.genre IN ['Fantasy', 'Mystery']",
policies: [ 'local.StockManagerFiction' ],
...
}
[ams] - Resulting privileges for READ on AdminService.Books : [
{
grant: 'READ',
to: [ 'stock-manager' ],
where: "genre.name IN ('Fantasy', 'Mystery')"
}
]You can add general user information by applying user tracing.
Tip
It might be useful to investigate the injected filter conditions by activating the query-trace (logger com.sap.cds.persistence.sql).
Role Assignment with XSUAA
Information about roles and attributes can be made available to the XSUAA platform service. This information enables the respective JWT tokens to be constructed and sent with the requests for authenticated users.
In particular, the following happens automatically behind-the-scenes upon build:
Generate Security Descriptor
Derive scopes, attributes, and role templates from the CDS model:
cds add xsuaacds add xsuaa --for productionThis generates an xs-security.json file:
{
  "scopes": [
    { "name": "$XSAPPNAME.admin", "description": "admin" }
  ],
  "attributes": [
    { "name": "level", "description": "level", "valueType": "s" }
  ],
  "role-templates": [
    { "name": "admin", "scope-references": [ "$XSAPPNAME.admin" ], "description": "generated" }
  ]
}
For every role name in the CDS model, one scope and one role template are generated with the exact name of the CDS role.
Re-generate on model changes
You can have such a file re-generated via
cds compile srv --to xsuaa > xs-security.jsonSee Application Security Descriptor Configuration Syntax in the SAP HANA Platform documentation for the syntax of the xs-security.json and advanced configuration options.
Avoid invalid characters in your models
Roles modeled in CDS may contain characters considered invalid by the XSUAA service.
If you modify the xs-security.json manually, make sure that the scope names in the file exactly match the role names in the CDS model, as these scope names will be checked at runtime.
Publish Security Descriptor
If there's no mta.yaml present, run this command:
cds add mtaSee what this does in the background…
- It creates an mta.yaml file with an
xsuaaservice. - The created service added to the
requiressection of your backend, and possibly other services requiring authentication.
modules:
  - name: bookshop-srv
    requires:
      - bookshop-auth // [!code ++]
resources:
  name: bookshop-auth // [!code ++]
  type: org.cloudfoundry.managed-service // [!code ++]
  parameters:
    service: xsuaa // [!code ++]
    service-plan: application // [!code ++]
    path: ./xs-security.json # include cds managed scopes and role templates
    config:
      xsappname: bookshop-${org}-${space} // [!code ++]
      tenant-mode: dedicated # 'shared' for multitenant deployments
Inline configuration in the mta.yaml config block and the xs-security.json file are merged. If there are conflicts, the MTA security configuration has priority.
Learn more about building and deploying MTA applications.
Assign Roles in SAP BTP Cockpit
This is a manual step a user administrator would do in SAP BTP Cockpit to setup and assign roles for the application:
By creating a service instance of the xsuaa service, all the roles from the xs-security.json file are already added to your subaccount. Next, you create a role collection that assigns these roles to your users.
Open the SAP BTP Cockpit.
For your trial account, this is: https://cockpit.hanatrial.ondemand.com
Navigate to your subaccount and then choose Security > Role Collections.
Choose Create New Role Collection:
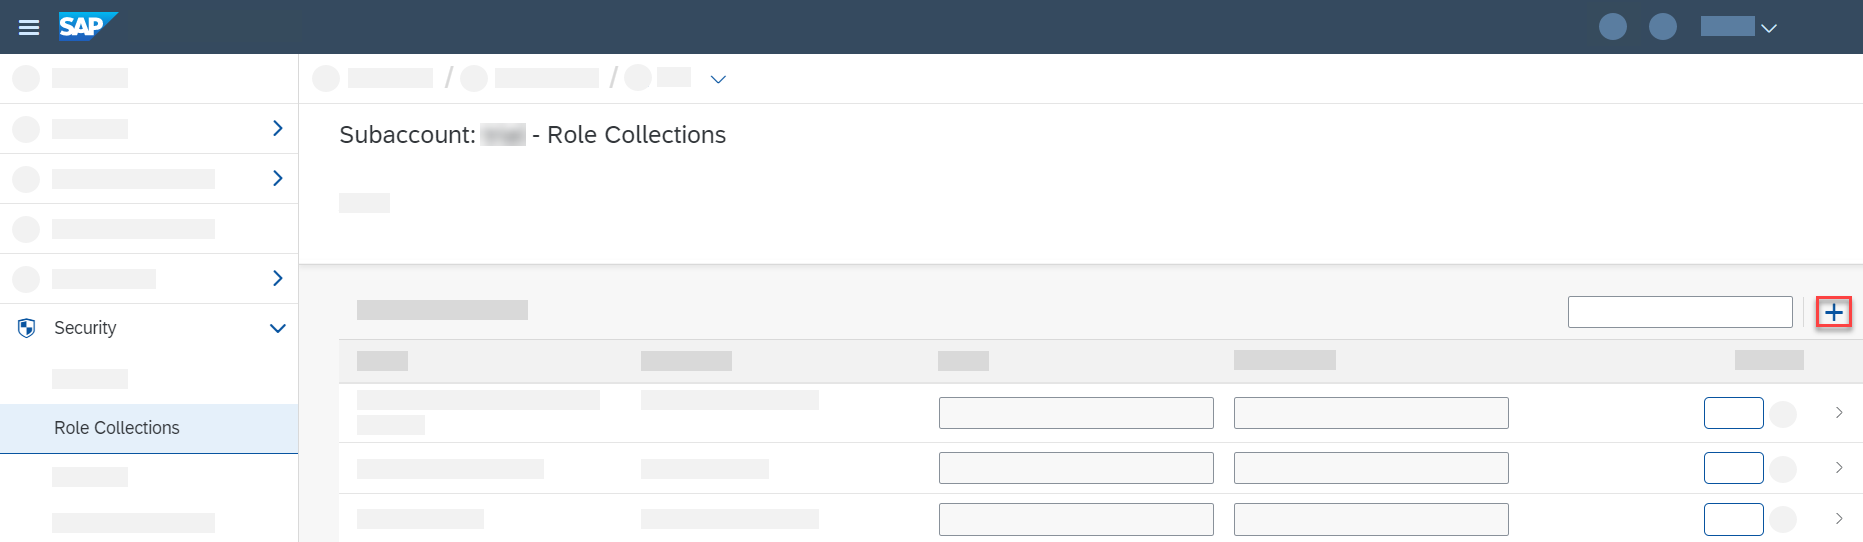
Enter a Name for the role collection, for example
BookshopAdmin, and choose Create.Choose your new role collection to open it and switch to Edit mode.
Add the
adminrole for your bookshop application (application idbookshop!a<XXXX>) to the Roles list.Add the email addresses for your users to the Users list.
Choose Save
If a user attribute isn't set for a user in the identity provider of the SAP BTP Cockpit, this means that the user has no restriction for this attribute. For example, if a user has no value set for an attribute "Country", they're allowed to see data records for all countries. In the xs-security.json, the attribute entity has a property valueRequired where you as the developer can specify whether unrestricted access is possible by not assigning a value to the attribute.
Developing with CAP Users
CAP is not tied to any specific authentication method, nor to concrete user information such as that provided by IAS or XSUAA. Instead, an abstract user representation is attached to the request which can be used to influence request processing. For example, both authorization enforcement and domain logic can depend on properties of the the current user.
Warning
Avoid writing custom code against the raw authentication information such as dedicated XSUAA properties. This undermines the decoupling between authentication strategy and your business logic.
Tip
In most cases, there is no need to write custom code dependent on the CAP user - leverage CDS modelling whenever possible.
Reflection
The CAP user of a request is represented by a UserInfo object that can be retrieved from the RequestContext of a handler in different ways.
Either by directly requesting from the context like in the example:
@Before(entity = Books_.CDS_NAME)
public void beforeReadBooks(CdsReadEventContext context) {
  UserInfo userInfo = context.getUserInfo();
  String name = userInfo.getName();
  // [...]
}
or by Spring dependency injection within a handler bean:
@Autowired
UserInfo userInfo;

@After(event = CqnService.EVENT_READ)
public void discountBooks(Stream<Books> books) {
  String name = userInfo.getName();
  // [...]
}
There is always an UserInfo attached to the current RequestContext, reflecting any type of users. The UserInfo object is not modifyable, but during request processing, a new RequestContext can be spawned and may be accompanied by a switch of the current user.
Depending on the configured authentication strategy, CAP derives a default set of user claims containing the user's name, tenant, attributes and assigned roles:
| User Property | UserInfo Getter | XSUAA JWT Property | IAS JWT Property | @restrict-annotation |
|---|---|---|---|---|
| Logon name | getName() | user_name | sub | $user |
| Tenant | getTenant() | zid | app_tid | $tenant |
| Attributes | getAttributeValues(String attr) | xs.user.attributes.<attr> | All non-meta attributes | $user.<attr> |
| Roles | getRoles() and hasRole(String role) | scopes | n/a - injected via AMS | String in to-clause |
Info
CAP does not make any assumptions on the presented claims given in the token. String values are copied as they are.
In addition, there are getters to retrieve information about pseudo-roles:
| UserInfo method | Description | CAP Role |
|---|---|---|
isAuthenticated() | True if the current user has been authenticated. | authenticated-user |
isSystemUser() | Indicates whether the current user has pseudo-role system-user. | system-user |
isInternalUser() | Indicates whether the current user has pseudo-role internal-user. | internal-user |
isPrivileged() | Returns true if the current user runs in privileged mode, i.e. is unrestricted. | - |
In CAP Node.js, the CAP user of a request is represented by a cds.User object. An instance of cds.User representing the current principal is available from the current request context in req.user. Similarly, the identifier of the user's tenant is available from req.tenant.
srv.before('READ', srv.entities.Books, req => {
  const { user, tenant } = req
  // [...]
})
In addition to the request context, information about the current user can similarly be retrieved from the global cds.context, which provides access to the current cds.EventContext:
const cds = require('@sap/cds')
const { user, tenant } = cds.context
Tip
Prefer local req objects in your handlers for accessing event context properties, as each access to cds.context happens through AsyncLocalStorage.getStore(), which induces some minor overhead.
Setting cds.context usually happens in inbound authentication middlewares or in inbound protocol adapters. During processing, you can set it programmatically or spawn a new root transaction providing a context argument to achieve a switch of the current user.
Depending on the configured authentication strategy, CAP derives a default set of user claims containing the user's name, tenant, attributes and assigned roles:
| User Property | UserInfo Getter | XSUAA JWT Property | IAS JWT Property | @restrict-annotation |
|---|---|---|---|---|
| Logon name | user.id | user_name | sub | $user |
| Tenant | req.tenant / cds.context.tenant | zid | app_tid | $tenant |
| Attributes | attr(attr) | xs.user.attributes.<attr> | All non-meta attributes | $user.<attr> |
| Roles | is(role) | scopes | n/a - injected via AMS | String in to-clause |
Customizing Users
In most cases, CAP's default mapping to the CAP user matches your requirements, but CAP also allows you to customize the mapping according to specific needs.
For instance, the logon name as injected by standard XSUAA integration might not be unique if several customer identity providers are connected to the underlying identity service. Here a combination of user_name and origin mapped to $user might be a feasible solution that you can implement in a custom adaptation.
This is done by means of a custom UserInfoProvider interface that can be implemented as Spring bean as demonstrated in Registering Global Parameter Providers:
Sample implementation to override the user name
@Component
@Order(1)
public class UniqeNameUserInfoProvider implements UserInfoProvider {

    private UserInfoProvider defaultProvider;

    @Override
    public UserInfo get() {
        ModifiableUserInfo userInfo = UserInfo.create();
        if (defaultProvider != null) {
            UserInfo prevUserInfo = defaultProvider.get();
            if (prevUserInfo != null) {
                userInfo = prevUserInfo.copy();
            }
        }
        if (userInfo != null) {
           XsuaaUserInfo xsuaaUserInfo = userInfo.as(XsuaaUserInfo.class);
           userInfo.setName(xsuaaUserInfo.getEmail() + "/" +
                            xsuaaUserInfo.getOrigin()); // adapt name
        }

        return userInfo;
    }

    @Override
    public void setPrevious(UserInfoProvider prev) {
        this.defaultProvider = prev;
    }
}
In the example, the UniqeNameUserInfoProvider defines an overlay on the default XSUAA-based provider (defaultProvider) by leveraging chaining technique (@Order(1) ensures proper ordering). UserInfo.copy() returns ModifiableUserInfo interface which allows arbitrary modifications such as overriding the user's name by a combination of email and origin.
Be very careful when redefining $user
The user name is frequently stored with business data (for example, managed aspect) and might introduce migration efforts. Also consider data protection and privacy regulations when storing user data.
There are multiple reasonable use cases in which user modification is a suitable approach:
- Injecting or mixing user roles by calling
modifiableUserInfo.addRole(String role)(In fact this is the base for AMS plugin injecting user-specific roles). - Providing calculated attributes used for instance-based authorization by invoking
modifiableUserInfo.setAttributeValues(String attribute, List<String> values). - Constructing a request user based on forwarded (and trusted) header information, completely replacing default authentication.
In most cases, CAP's default mapping to the CAP user will match your requirements, but CAP also allows you to customize the mapping according to specific needs.
For instance, the logon name as injected by standard XSUAA integration might not be unique if several customer IdPs are connected to the underlying identity service. Here a combination of user_name and origin mapped to $user might be a feasible solution that you can implement in a custom adaptation.
This can be done by modifying cds.middlewares. To modify the cds.context.user while still relying on existing generic middlewares, a new middleware must be registered after the auth middleware. If you intend to manipulate the cds.context.tenant as well, the new middleware must run before cds.context.model is set for the current request.
Sample implementation to override the user id
cds.middlewares.before = [
  cds.middlewares.context(),
  cds.middlewares.trace(),
  cds.middlewares.auth(),
  function ctx_user (_,__,next) {
    const ctx = cds.context
    ctx.user.id = ctx.user.attr('origin') + ctx.user.id
    next()
  },
  cds.middlewares.ctx_model()
]
There are multiple reasonable use cases in which user modification is a suitable approach:
- Overriding user roles by calling
user.roles(roles). - Overriding user attributes and providing calculated attributes used for instance-based authorization by invoking
user.attr(attributes).
Be very careful when redefining $user and customizing cds.middlewares
The user name is frequently stored with business data (for example, managed aspect) and might introduce migration efforts. Also consider data protection and privacy regulations when storing user data.
Custom Authentication Middleware
In case you require even more control, it is possible to replace the authentication middleware with a fully Custom Authentication.
Switching Users
There are a few typical use cases in a (multitenant) application where switching the current user of the request is required. For instance, the business request on behalf of a named subscriber user needs to reach out to a platform service on behalf of the underlying technical user of the subscriber.
These scenarios are identified by a combination of the user (technical or named) and the tenant (provider or subscriber):

The user context can only be modified by explicitly opening an appropriate Request Context which ensures a well-defined scope for the changed settings. Services might, for example, trigger HTTP requests to external services by deriving the target tenant from the current Request Context.
The RequestContextRunner API offers convenience methods that allow an easy transition from the current Request Context to a derived one according to the concrete scenario.
| Method | Scenario |
|---|---|
systemUser() | Switches to the technical user and preserves the tenant from the current user. |
systemUserProvider() | Switches to the technical user of the provider account. |
systemUser(tenant) | Switches to a technical user targeting a given subscriber account. |
privilegedUser() | Elevates the current UserInfo to by-pass all authorization checks. |
anonymousUser() | Switches to an anonymous user. |
Named user contexts are only created by the CAP Java framework as initial Request Context based on appropriate authentication information (for example, JWT token) attached to the incoming HTTP request.
Info
- It is not possible to switch from technical user to a named user.
- Asynchronous requests to CAP services are always on behalf of a technical user.
There are a few typical use cases in a (multitenant) application, where switching the current user of the request is required. For instance, the business request on behalf of a named subscriber user needs to reach out to a service on behalf of the subscribers technical user.
These scenarios are identified by a combination of the user (technical or named) and the tenant (provider or subscriber):

In CAP Node.js, the cds.context allows to access the current cds.EventContext and enables updating the principal of the context. The prefered method for switching users and executing code in a different context and for a different principal, is to spawn a new root transaction using cds/srv.tx(). Providing a ctx argument when creating a new root transaction allows switching the user for nested operations. The cds.User class exposes convenience constructors and accessors for specialized cds.User instances that represent typical technical principals you may require.
const newUser = new cds.User({ id: '...', roles: [...], ...})
await srv.tx ({ user: newUser, tenant: '<target-tenant>' }, async tx => {
  // Perform operations with a privileged principal
})
Tip
When creating new root transactions in calls to cds/srv.tx(), all properties not specified in the ctx argument are inherited from cds.context, if set in the current continuation.
Switching to Technical User

The incoming JWT token triggers the creation of an initial Request Context with a named user. Accesses to the database in the OData Adapter as well as the custom On handler are executed within tenant1 and authorization checks are performed for user JohnDoe. An additionally defined After handler wants to call out to an external service using a technical user without propagating the named user JohnDoe. To achieve this, it's required to call requestContext() on the current CdsRuntime and use the systemUser() method to remove the named user from the new Request Context:
@After(entity = Books_.CDS_NAME)
public void afterHandler(EventContext context){
    runtime.requestContext().systemUser().run(reqContext -> {
        // call technical service
    });
}
The incoming JWT token triggers the creation of an initial cds.EventContext with a named user. Accesses to the database in the OData Adapter as well as the custom .on handler are executed within tenant1 and authorization checks are performed for user JohnDoe.
In addition, there is an .after handler that wants to call out to an external service using a technical user without propagating the named user JohnDoe. To achieve this, you can create a new root transaction using srv.tx and use it to connect to the external service from within a new context:
srv.after('*', srv.entities.Books, async (res, req) => {
  await srv.tx({ user: cds.User.privileged }, async tx => {
    // call technical service
  })
})
Switching to Technical Provider Tenant

The application offers a bound action in a CDS entity. Within the action, the application communicates with a remote CAP service using an internal technical user from the provider account. The corresponding on handler of the action needs to create a new Request Context by calling requestContext(). Using the systemUserProvider() method, the existing user information is removed and the tenant is automatically set to the provider tenant. This allows the application to perform an HTTP call to the remote CAP service, which is secured using the pseudo-role internal-user.
@On(entity = Books_.CDS_NAME)
public void onAction(AddToOrderContext context){
    runtime.requestContext().systemUserProvider().run(reqContext -> {
        // call remote CAP service
    });
}
In this scenario the application offers a bound action in a CDS entity. Within the action, the application communicates with a remote CAP service using a privileged user and the provider tenant. The corresponding .on handler of the action needs to create a new root transaction by calling srv.tx. The user passed to srv.tx in the ctx attribute will be used as the principal for requests made within the new root transaction.
srv.on('action', srv.entities.Books, async req => {
  const systemUser = new cds.User({ id: 'system', roles: [ 'internal-user' ] })
  await srv.tx({ user: systemUser , tenant: 'provider-tenant' }, async tx => {
    // call remote CAP service
  })
})
Switching to a Specific Technical Tenant

The application is using a job scheduler that needs to regularly perform tasks on behalf of a certain tenant. By default, background executions (for example in a dedicated thread pool) aren't associated to any subscriber tenant and user. In this case, it's necessary to explicitly define a new Request Context based on the subscribed tenant by calling systemUser(tenantId). This ensures that the Persistence Service performs the query for the specified tenant.
runtime.requestContext().systemUser(tenant).run(reqContext -> {
    return persistenceService.run(Select.from(Books_.class))
        .listOf(Books.class);
});
Resource Bottlenecks in Tenant Looping
Avoid iterating through all subscriber tenants to perform tenant-specific tasks. Instead, prefer a task-based approach which processes specific subscriber tenants selectively.

The application is using cds.spawn to regularly perform tasks on behalf of a certain tenant. By default, operations that are nested within cds.spawn will inherit the outer context. You can explicitly define the context cds.spawn should use by passing relevant information in a ctx argument. This enables to ensure that the Persistence Service performs the query for the specified tenant.
cds.spawn({ user: cds.User.privileged, tenant: 'tenant1', every: '1h' }, async tx => {
    await persistenceService.run(SELECT.from(Books))
})
Resource Bottlenecks in Tenant Looping
Avoid iterating through all subscriber tenants to perform tenant-specific tasks. Instead, prefer a task-based approach which processes specific subscriber tenants selectively.
Switching to Privileged User
Application services invoked within custom handlers enforce an authorization on second-layer, which is the preferred behaviour to ensure security by default. However, in certain situations, you might want to bypass additional authorization checks if the initial request authorization is deemed sufficient.
Such service calls can be executed on behalf of a privileged user, acting as a superuser without restrictions:
cdsRuntime.requestContext().privilegedUser().run(privilegedContext -> {
  assert privilegedContext.getUserInfo().isPrivileged();
  // service calls in this scope pass generic authorization handler
});
Warning
Call application services on behalf of the privileged user only in case the service call is fully independent from the business user's actual restrictions.
Switching to Anonymous User
In rare situations you might want to call a public service without sharing information of the current request user. In this case, you explicitly prevent user propagation.
Such service calls can be executed on behalf of the anonymous user, acting as a public user without personal user claims:
cdsRuntime.requestContext().anonymousUser().run(privilegedContext -> {
  // ... Service calls in this scope pass generic authorization handler

});
In rare situations you might want to call a public service without sharing information about the current request user. In this case, you can explicitly prevent user propagation by running in a context whose principal is the anonymous user.
cds.tx({ user: cds.User.anonymous }, async tx => {
  // Perform operations anonymously
})
User Propagation
Between Threads
Within the same Request Context, all CAP service calls share the same user information. By default, the Request Context of the current thread is not shared with spawned threads and hence user information is lost. If you want to avoid this, you can propagate the Request Context to spawned threads as described here and hence the same user context is applied.
Non-CAP Libraries
CAP plugins for IAS and XSUAA store the resolved user information in Spring's SecurityContext which contains all relevant authentication information. Hence, library code can rely on standards to fetch the authentication information and restore the user information if needed.
In addition, the authentication information is stored in the Request Context and can be fetched as sketched here:
AuthenticationInfo authInfo = context.getAuthenticationInfo();
JwtTokenAuthenticationInfo jwtTokenInfo = authInfo.as(JwtTokenAuthenticationInfo.class);
String jwtToken = jwtTokenInfo.getToken();
CAPs generic authentication middlewares for IAS and XSUAA maintain resolved authentication information in the authInfo attribute of cds.context.user. For @sap/xssec-based authentication strategies (ias, jwt, and xsuaa), cds.context.user.authInfo is an instance of @sap/xssec's SecurityContext. You can retrieve available authentication information for use in a non-CAP library from the SecurityContext.
const authInfo = cds.context.user.authInfo  // @sap/xssec SecurityContext
const token = authInfo.token                // @sap/xssec Token
const jwtToken = token.jwt                  // string
Warning
The cds.User.authInfo property depends on the authentication library that you use. CAP does not guarantee the content of this property. Use it with caution. Always pin your dependencies as described in the best practices.
Remote Services
Remote APIs can be invoked either on behalf of a named user or a technical user, depending on the callee's specification.
Thus, a client executing a business request within a specific user context might need to explicitly adjust the user propagation strategy.
CAP's Remote Services offer an easy and declarative way to define client-side representations of remote service APIs.
Such services integrate seamlessly with CAP, managing connection setup, including authentication and user propagation:
cds:
  remote.services:
    SomeReuseService:
      binding:
        name: reuse-service-instance
        onBehalfOf: systemUserProvider
The parameter onBehalfOf in the binding configuration section allows to define the following user propagation strategies:
currentUser(default): Propagate the user of the current Request Context.systemUser: Propagate the (tenant-specific) technical user, based on the tenant set in the current Request Context.systemUserProvider: Propagate the technical user of the provider tenant.
Tip
Remote Services configurations with destination section support onBehalfOf only in case of IAS App-2-App flows.
CAP's Remote Services offer an easy and declarative way to define client-side representations of remote service APIs.
Such services integrate seamlessly with CAP, managing connection setup, including authentication and user propagation. Under the hood CAP utilizes the BTP Destinations and @sap-cloud-sdk/connectivity to do most of the heavy lifting.
{
  "cds": {
    "requires": {
      "SomeReuseService": {
        "kind": "odata",
        "model": "srv/external/SomeReuseService",
        "credentials": {
          "destination": "some-reuse-service",
          "path": "/reuse/odata/api",
        }
      }
    }
  }
}
Tip
Always prefer using Remote Services over natively consuming Cloud SDK.
Cloud SDK
On a programmatic level, the CAP runtime integrates with Cloud SDK offering an abstraction for connection setup with remote services, including authentication and user propagation. By default,
- the tenant of the current Request Context is propagated under the hood.
- the user token is propagated via Spring's
SecurityContext. - user propagation strategy can be specified with parameter values
OnBehalfOf.
Tip
Prefer using Remote Services built on Cloud SDK rather than natively consuming the Cloud SDK.
Pitfalls
Don't write custom code against user types of an identity service (XSUAA / IAS).
Instead, if it is required at all to code against user types, use CAP's user abstraction layer (
UserInfoin Java orreq.userin Node.js) to handle user-related logic.Don't try to propagate named user context in asynchronous requests.
This can happen when using the Outbox pattern or Messaging. Asynchronous tasks are typically executed outside the scope of the original request context, after successful authorization. Propagating the named user context can lead to inconsistencies or security issues. Instead, use technical users for such scenarios.
Don't mix CAP Roles for business and technical users.
CAP roles should be clearly separated based on their purpose: Business user roles are designed to reflect how end users interact with the application. Technical user roles are intended for system-level operations, such as background tasks or service-to-service communication. Mixing these roles can lead to confusion and unintended access control issues.
Don't mix AMS Policy level with CAP Role level.
AMS policies operate at the business level, while CAP roles are defined at the technical domain level. Avoid mixing these two layers, as this could undermine the clarity and maintainability of your authorization model.
Don't choose entity attributes as AMS Attributes whose relevance is too small.
Such attributes should have a broad, domain-wide relevance and be applicable across multiple entities. Typically, only a limited number of attributes (less than 10) meet this criterion. Exposing entity-specific attributes as AMS attributes can lead to unnecessary complexity and reduced reusability.