---
description: >
Supported development environments (IDEs) and features of the CDS language editor.
---
# CDS Editors and IDEs
[[toc]]
## Visual Studio Code {#vscode}
#### Install Visual Studio Code {#install-vscode}
1. Install [_Visual Studio Code_](https://code.visualstudio.com) and launch it.
2. Only for macOS: Install the `code` shell command.
{ style="box-shadow: 1px 1px 5px #888888; width:450px;" .ignore-dark}
#### Add CDS Editor
1. Go to [**Visual Studio Marketplace**](https://marketplace.visualstudio.com/items?itemName=SAPSE.vscode-cds).
2. Click *Install* and confirm the popup dialog.
3. In VS Code, choose *Install* to enable the extension.
#### Add Useful Plugins
In addition we recommend installing these VS Code extensions:
- [REST Client](https://marketplace.visualstudio.com/items?itemName=humao.rest-client)
- [SQLite Viewer](https://marketplace.visualstudio.com/items?itemName=qwtel.sqlite-viewer)
- [Rainbow CSV](https://marketplace.visualstudio.com/items?itemName=mechatroner.rainbow-csv)
- [ESLint](https://marketplace.visualstudio.com/items?itemName=dbaeumer.vscode-eslint)
#### Run Services
To run services, just open the integrated terminal in VS Code and use one of the `cds serve` variants, for example, use `cds watch` to automatically react on changes.
Alternatively, you can use the preconfigured tasks or launch configurations you get when creating a project with `cds init`.
For example, in the _Debug_ view launch _cds run_ with the green arrow button:
{ style="box-shadow: 1px 1px 5px #888888; width:250px;" .ignore-dark}
#### Debug Services
You can add and stop at breakpoints in your service implementations. For example, add one to line 10 of our _srv/cat-service.js_ by clicking in the gutter as shown here:
{ style="box-shadow: 1px 1px 5px #888888; width:250px;"}
... then send the _[.../Books](http://localhost:4004/browse/Books)_ request again to stop there.
#### Restart the Server
Restart the server when you did changes to your code using the *Debug* views restart button:
{ style="box-shadow: 1px 1px 5px #888888; width:250px;" .ignore-dark}
## IntelliJ
[SAP CDS Language Support](https://plugins.jetbrains.com/plugin/25209-sap-cds-language-support) for IntelliJ provides syntax highlighting, code completion, formatting, navigation, hover documentation, workspace symbol search, and more.
The plugin supports free and commercial IntelliJ IDEs including IntelliJ IDEA Community, IDEA Ultimate and WebStorm.
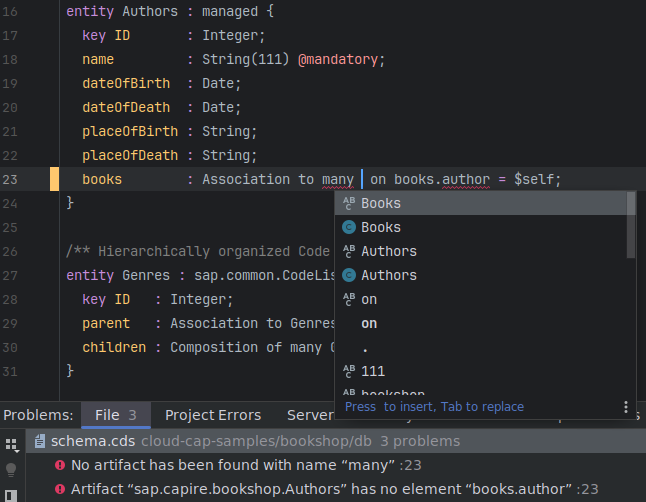{ .ignore-dark style="width:450px"}
See the [detailed feature list](https://github.com/cap-js/cds-intellij/blob/main/docs/features.md) and the [installation instructions](https://github.com/cap-js/cds-intellij#requirements) for how to get started.
[Report issues and provide feedback](https://github.com/cap-js/cds-intellij/issues).
## CDS Editors & LSP {#cds-editor}
Using the CDS language server implementation, editors can provide additional source code validation and Intellisense for _.cds_ files.
[Watch the **SAP CDS language support** extension for VS Code in action by DJ Adams.](https://www.youtube.com/watch?v=eY7BTzch8w0){.learn-more}
### Features and Functions
#### Syntax Coloring & Code Completion
- Keywords
- Annotations
- Identifiers including ones defined in `using` references
- `using` paths
- i18n translation IDs
#### Snippets
- `using`
- `namespace` and `context`
- `service` and `type`
- `entity` and `projection`
- `Association` and `Composition`
- `extend` and `annotate`
- Elements
- Annotations for documentation
#### Code Formatting
- the whole document
- a selected range
- on-the-fly when completing statements using ```;``` or ```}```
- on save (depending on the IDE)
- on paste (depending on the IDE)
#### Hover Information
- Doc comments
- `@title`, `@description`, and ~~`@cds.doc`~~ (deprecated) annotations
- Translations
> With documentation extracts of [capire](../cds/cdl) explaining language concepts.
#### Where-used Navigation
- Navigate to definitions
- Navigate to references
- Highlight occurrences
#### Quick Fixes
+ Create using statement for unknown artifacts.
+ Maintain missing translation.
+ Convert `@cds.doc` and `@description` annotations to doc comments.
#### Translation Support
- Properties, JSON, and CSV files
- Navigate to translation definitions from translation IDs like `'{i18n>customerName}'`
- Show translations on hover
#### And More…
- Plugin framework for external handlers of annotation domains
- Dependency graph visualization
### Settings
##### Code formatting
These are settings coming with the CDS language server implementation.
Use the command *CDS: Show Formatting Options Configuration*.
You see the settings, grouped into three tabs: *Alignment*, *Other*, and *Whitespace*
##### Format on Type, Format on Paste, and Format on Save in VS Code
These are settings from the editor in VS Code:
1. Press F1
1. Open *Preferences: Open User Settings*
1. Filter for _Format_.
1. Tick the checkboxes to enable the settings.
##### Cds: [Workspace Validation Mode](vscode://settings/cds.workspaceValidationMode)
Default: *ActiveEditorOnly*
Keeps track of the active editor in focus. Only changes there are immediately validated.
The *ActiveEditorOnly* mode is especially useful in situations when navigating through a large model, that is, having multiple files open (even if they are not shown as tabs)
and editing a file that the others directly or indirectly depend on.
##### Cds > Contributions > [Enablement: Odata](vscode://settings/cds.contributions.enablement.odata)
Default: *on*
This setting enables extended support for annotations, that is, refined diagnostics and code completion. Can be switched *off* for performance gains.
##### Cds > [Workspace: ScanCsn](vscode://settings/cds.workspace.scanCsn)
Default: *off*
Switch *on* to scan the workspace also for CSN files, additionally to CDS source files.
Note: CSN files are still considered if used from a CDS source file.
##### Cds > [Quickfix: ImportArtifact](vscode://settings/cds.quickfix.importArtifact)
Default: *off*
Enable to get quickfix proposals for artifact names, like entities, that aren't imported via a `using` statement. For that, all definitions in the workspace need to be considered, which might be slow.
### Commands
##### Welcome page
1. Press F1
1. Open *CDS: Show CAP Release Notes*
If there are new release notes, this page opens on startup. You can disable this behavior using the *Cds > [Release Notes: Show Automatically](vscode://settings/cds.releaseNotes.showAutomatically)* setting.
##### CAP Notebooks Page { #cap-notebooks-page }
1. Press F1
1. Open *CDS: Open CAP Notebooks Page*
This page provides information on all of features available in a CAP Notebook with a brief description and examples on each.
##### Beautify settings
1. Press F1
1. Open *CDS: Show Formatting Options Configuration*
##### Preview CDS sources
You want to create a preview of a specific _.cds_ file in your project. You can do that using the command line. Here is how you do it in VS Code:
1. Open the file you want to preview.
1. Open the context menu.
1. Select _Preview CDS source as..._ .
1. Choose the preview you want to see.
##### Visualize CDS file dependencies
Use the command from the context menu on a folder or CDS file, or from within the popup when hovering over an _import_ path at the end of a _using_ statement.
A selection popup appears to choose one of three modes:
1. **_File to file_ (detailed)**: shows every model file on its own. For very large models, the number of files and interdependencies may be too complex to be graphically shown. A message about insufficient memory will appear. In this case use the second option.
2. **_File to file_ (reduced to folders)**: reduces the graph by only showing the folders of all involved files and their interdependencies. Only the files reachable from the start model where the command was invoked on are evaluated.
4. **_Complete folder to complete folder_**: always considers all files in a folder and their dependencies.
This can be useful to understand architectural violations.
> **Example for architectural violation:**
> You want a clean layering in your project: _app_ → _srv_ → _db_. With this option, you can visualize and identify that there is a dependency from a file in the service layer to an annotation file in the application layer.
Hovering over a node will show the number of files involved and their combined size. Use this function to get a rough understanding about complexity and compilation speed.
### Editor Performance
With the following [settings](#settings) you can influence the performance of the editor:
##### Editor > Goto Location: Alternative Definition Command
Do not select *goToReferences*. Otherwise, being already on a definition often requires all models to be recompiled.
##### Workbench > Editor > Limit: Value
If open editors have `using` dependencies, a change in one editor will lead to a recompile of related editors. To decrease the impact on performance, lower the number.
##### Workbench > Editor > Limit: Enabled
To enable the limit value above, switch *on*.
##### Additional Hints to Increase Performance:
- Within _SAP Business Application Studio_: close _CAP Data Models and Services_ view. Otherwise, it will ask for all workspace symbols at every change.
- Commands _Go to References_ / _Find All References_ will recompile all models that might have changed due to a change in a depending model. If there are index models, it often means that the complete workspace is being recompiled.
Until a further change, reference calculation is reasonably fast.
- Command _Go to Symbol in Workspace_ will recompile the complete workspace once, after that it is reasonable fast.
- Changing settings in _CDS_ section will currently perform a complete workspace invalidation, that is, required indexes will lead to recompilations on demand as described above.
- Changing certain `cds.env` settings, for example folder configurations, will invalidate the workspace as well.
### CDS Source Formatter { #cds-formatter}
The CDS code formatter provides a command line interface. Use it as a pre-commit hook or within your CI/CD pipeline to ensure consistent formatting.
#### Installation
Install the CDS language server globally as a library via
```sh
npm i -g @sap/cds-lsp
```
You can now use the formatter command:
```sh
format-cds
```
#### Usage
For detailed usage information run the help command:
```sh
format-cds -h
```
You can create a settings file (_.cdsprettier.json_) with custom formatting options for your project.
Run this to create an initial version:
```sh
format-cds --init
```
> Commit the _.cdsprettier.json_ file into your version control system.
::: tip Use the visual VS Code settings
Run `CDS: Show Formatting Options Configuration` to jump to the [SAP CDS Language Support](https://marketplace.visualstudio.com/items?itemName=SAPSE.vscode-cds) settings, which shows a preview of selected formatter options.
:::
The effective set of formatting options is calculated in order of precedence:
1. Command line options
2. Options from _.cdsprettier.json_
3. Default options
It is possible to have _.cdsprettier.json_ files in subfolders. In that case, the closest file in the folder hierarchy is used for the respective CDS source.
Use `format-cds ...` to restrict the set of CDS source files.
By default, backup files with the _.bak_ file extension will be created. Use the `-f` switch to force an overwrite without creating a backup.
This is on your own risk. Should there be problems data loss might occur, especially when formatting in a pre-commit hook.
> We recommend adding _.bak_ to your _.gitignore_ file.
### GitHub Integration
CAP is registered with GitHub [`linguist`](https://github.com/github-linguist/linguist) repository, which means you can use Markdown rendering on GitHub in `cds` code fences like so:
````md
```cds
entity Books {};
```
````
This will render like so:
```cds
entity Books {};
```
## CAP Project Explorer
CAP Project Explorer is a sidebar view for exploring your CAP projects directly within VS Code. It gives you access to your project's structure and symbols. To get started, just select the CAP Project Explorer icon in the *VS Code activity bar* (left sidebar).
{.ignore-dark width="300px"}
##### Getting Started
1. Select the **CAP Project Explorer** icon in the VS Code activity bar (left sidebar).
2. Open the explorer view.
3. Browse the tree or use search to filter artifacts.
4. Right-click on items for context actions such as **Find References** or **Go to Definition**.
##### Configuration
You can configure the CAP Project Explorer in your VS Code settings:
- [`cds.explorer.enabled`](vscode://settings/cds.explorer.enabled): controls whether the CAP Project Explorer is active (default: `true`)
**Note:** A window reload is required after changing the `enabled` setting.
##### Available Commands
The following commands are available in the Command Palette (Cmd+Shift+P or Ctrl+Shift+P):
- **CDS Explorer: Search**: search for artifacts in your project
##### Benefits
The CAP Project Explorer helps you:
- Reduce navigation time with quick access to project artifacts
- Understand code structure through organized views
- Filter large projects to focus on relevant parts
- Switch between file-based and symbol-based perspectives on your codebase
## Using Docker { #docker }
Prerequisite: You have installed [Docker](https://docs.docker.com/get-started/).
#### Build an Image
Create a file called `Dockerfile` and add this content for a quick setup:
```docker
FROM node:lts
# or use `FROM node:` to match a specific Node version
# you have installed locally
USER node
ENV NPM_CONFIG_PREFIX=/home/node/.npm
ENV PATH=$NPM_CONFIG_PREFIX/bin:$PATH
RUN npm i -g @sap/cds-dk
```
Build your first image:
```sh
docker build -t cds .
```
#### Run a Service in a Container
1. Run a container that is based on the image:
```sh
docker run --publish 4004:4004 -it cds sh
```
> You see a `$` command prompt from _inside_ the container.
1. Move to the home directory:
```sh
cd
```
1. Write a simple cds file:
```sh
echo 'service CatalogService { entity Books { key ID: UUID; } }' \
> services.cds
```
1. Run the service:
```sh
cds run
```
1. Open [http://localhost:4004](http://localhost:4004) in a browser to test the application. You forwarded the port `4004` when running the container, which allows you to access the application as if it would run locally.